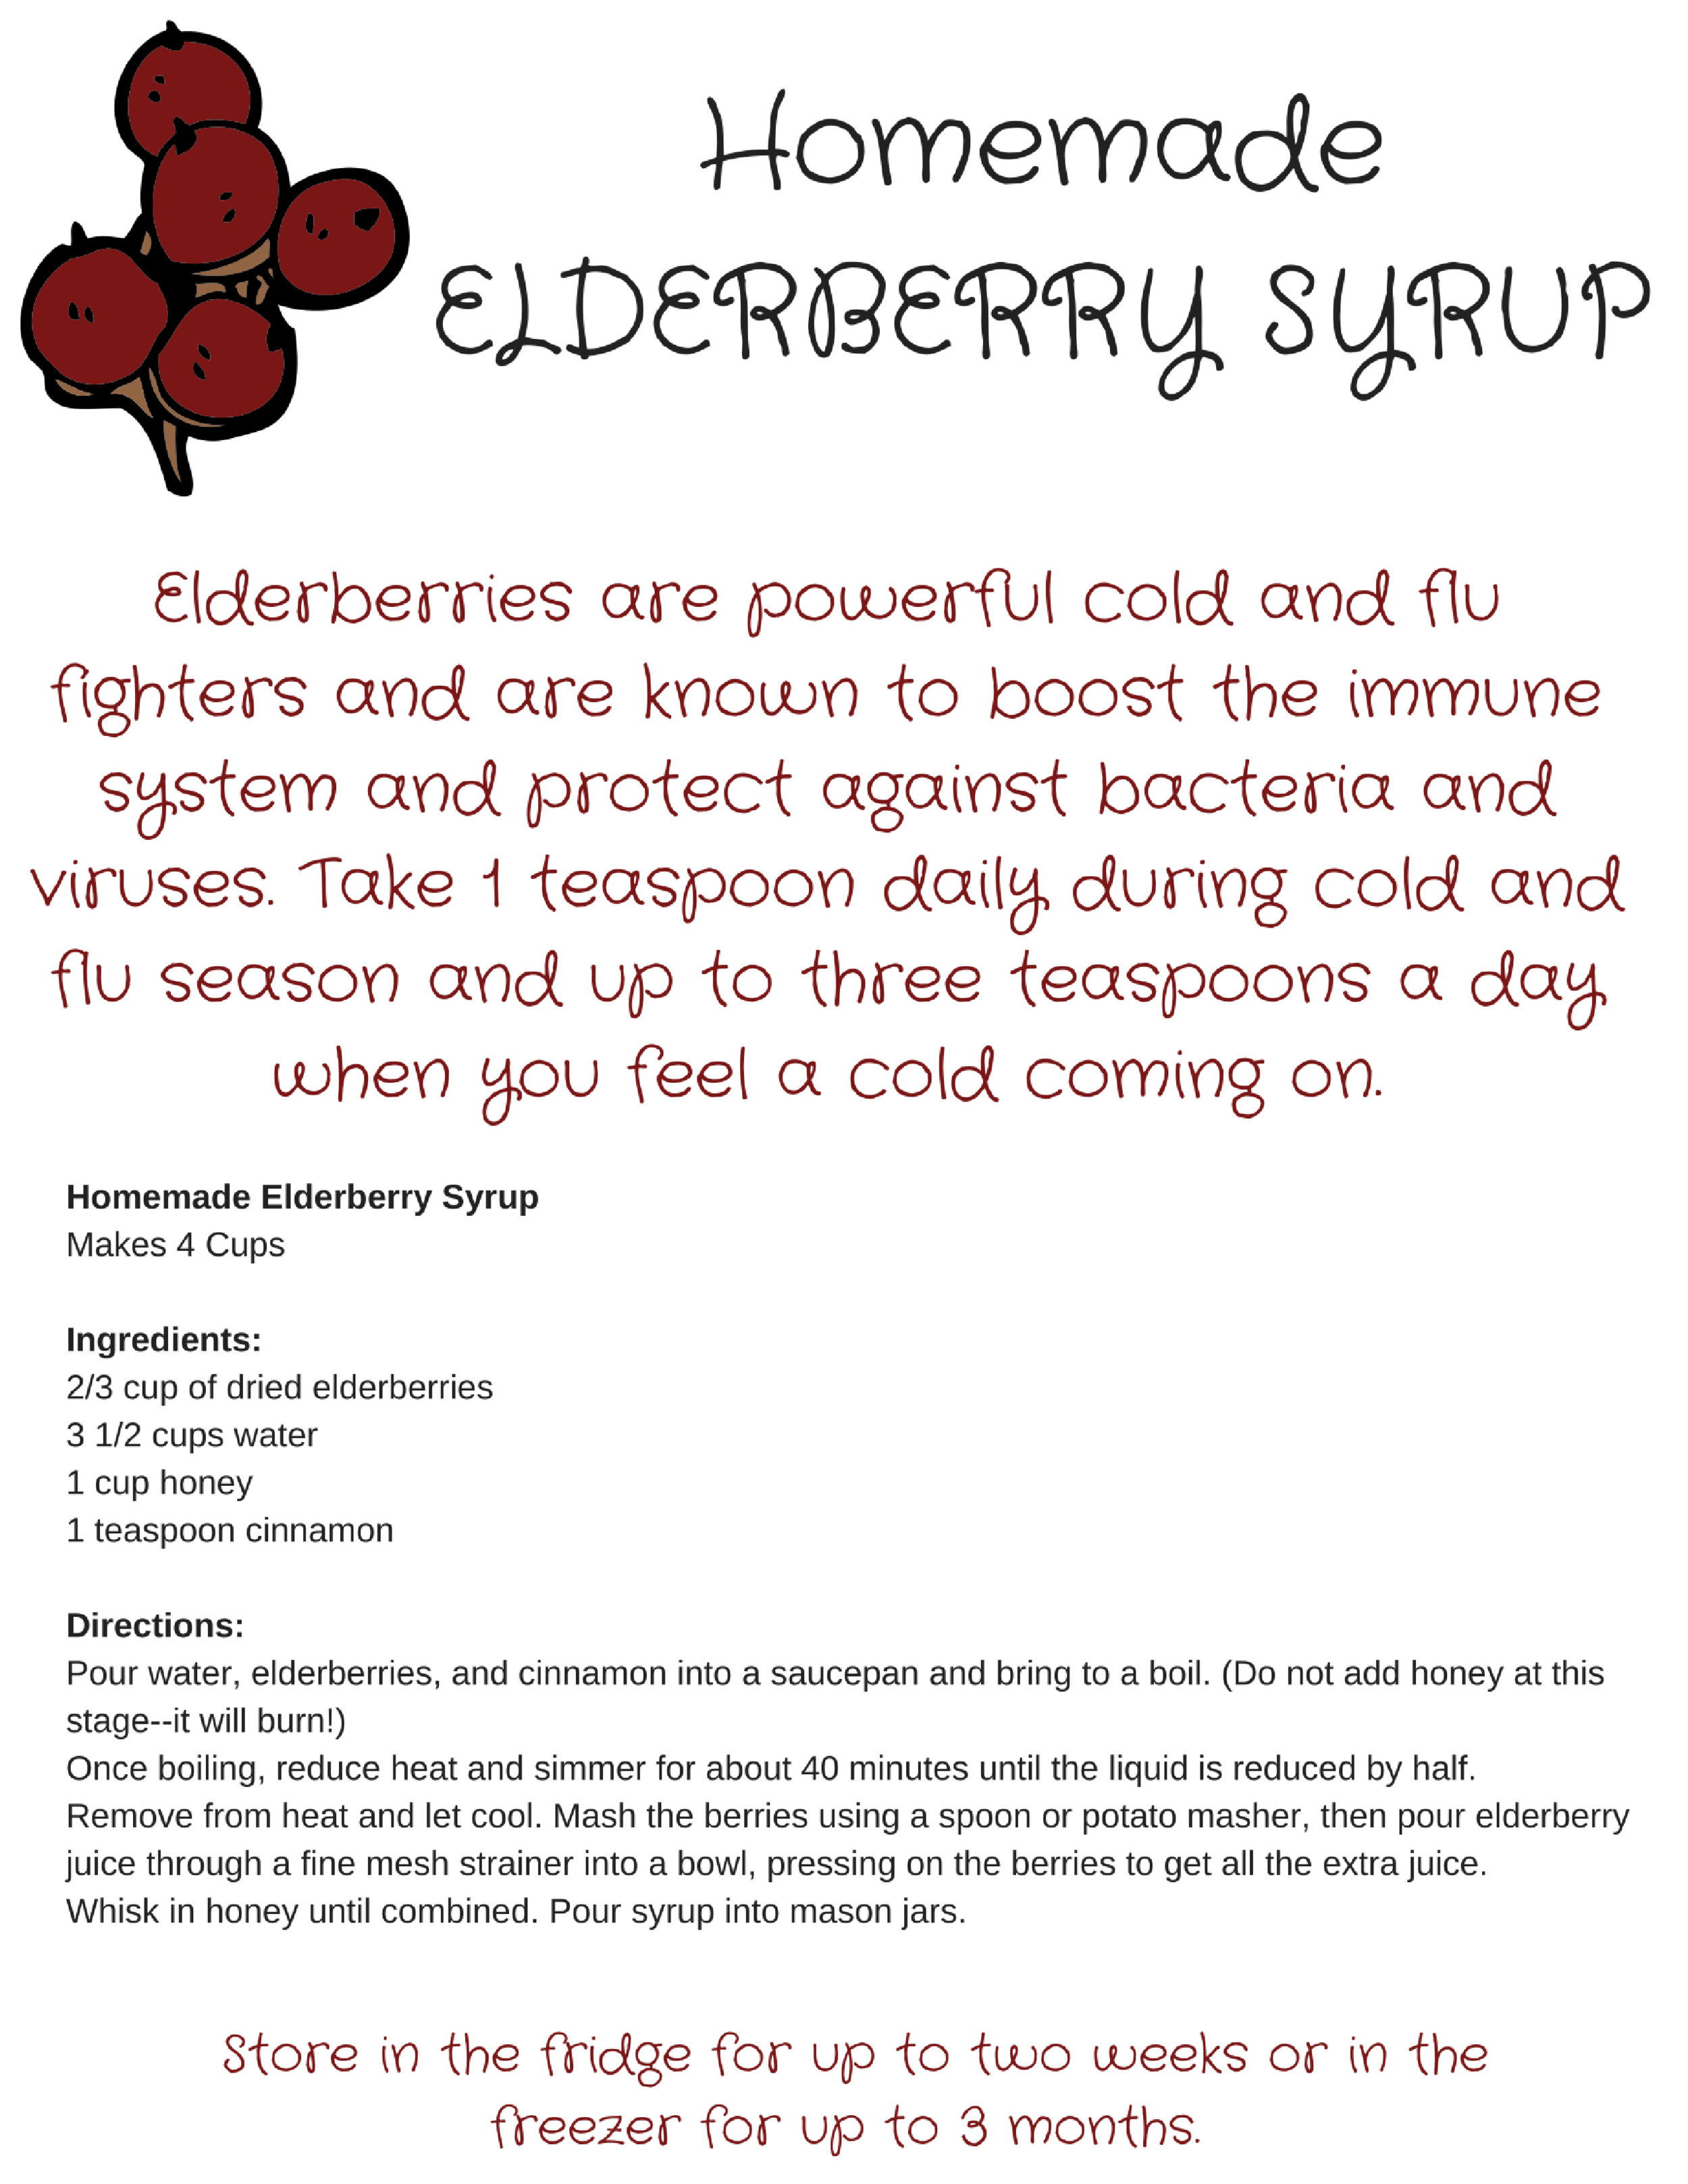
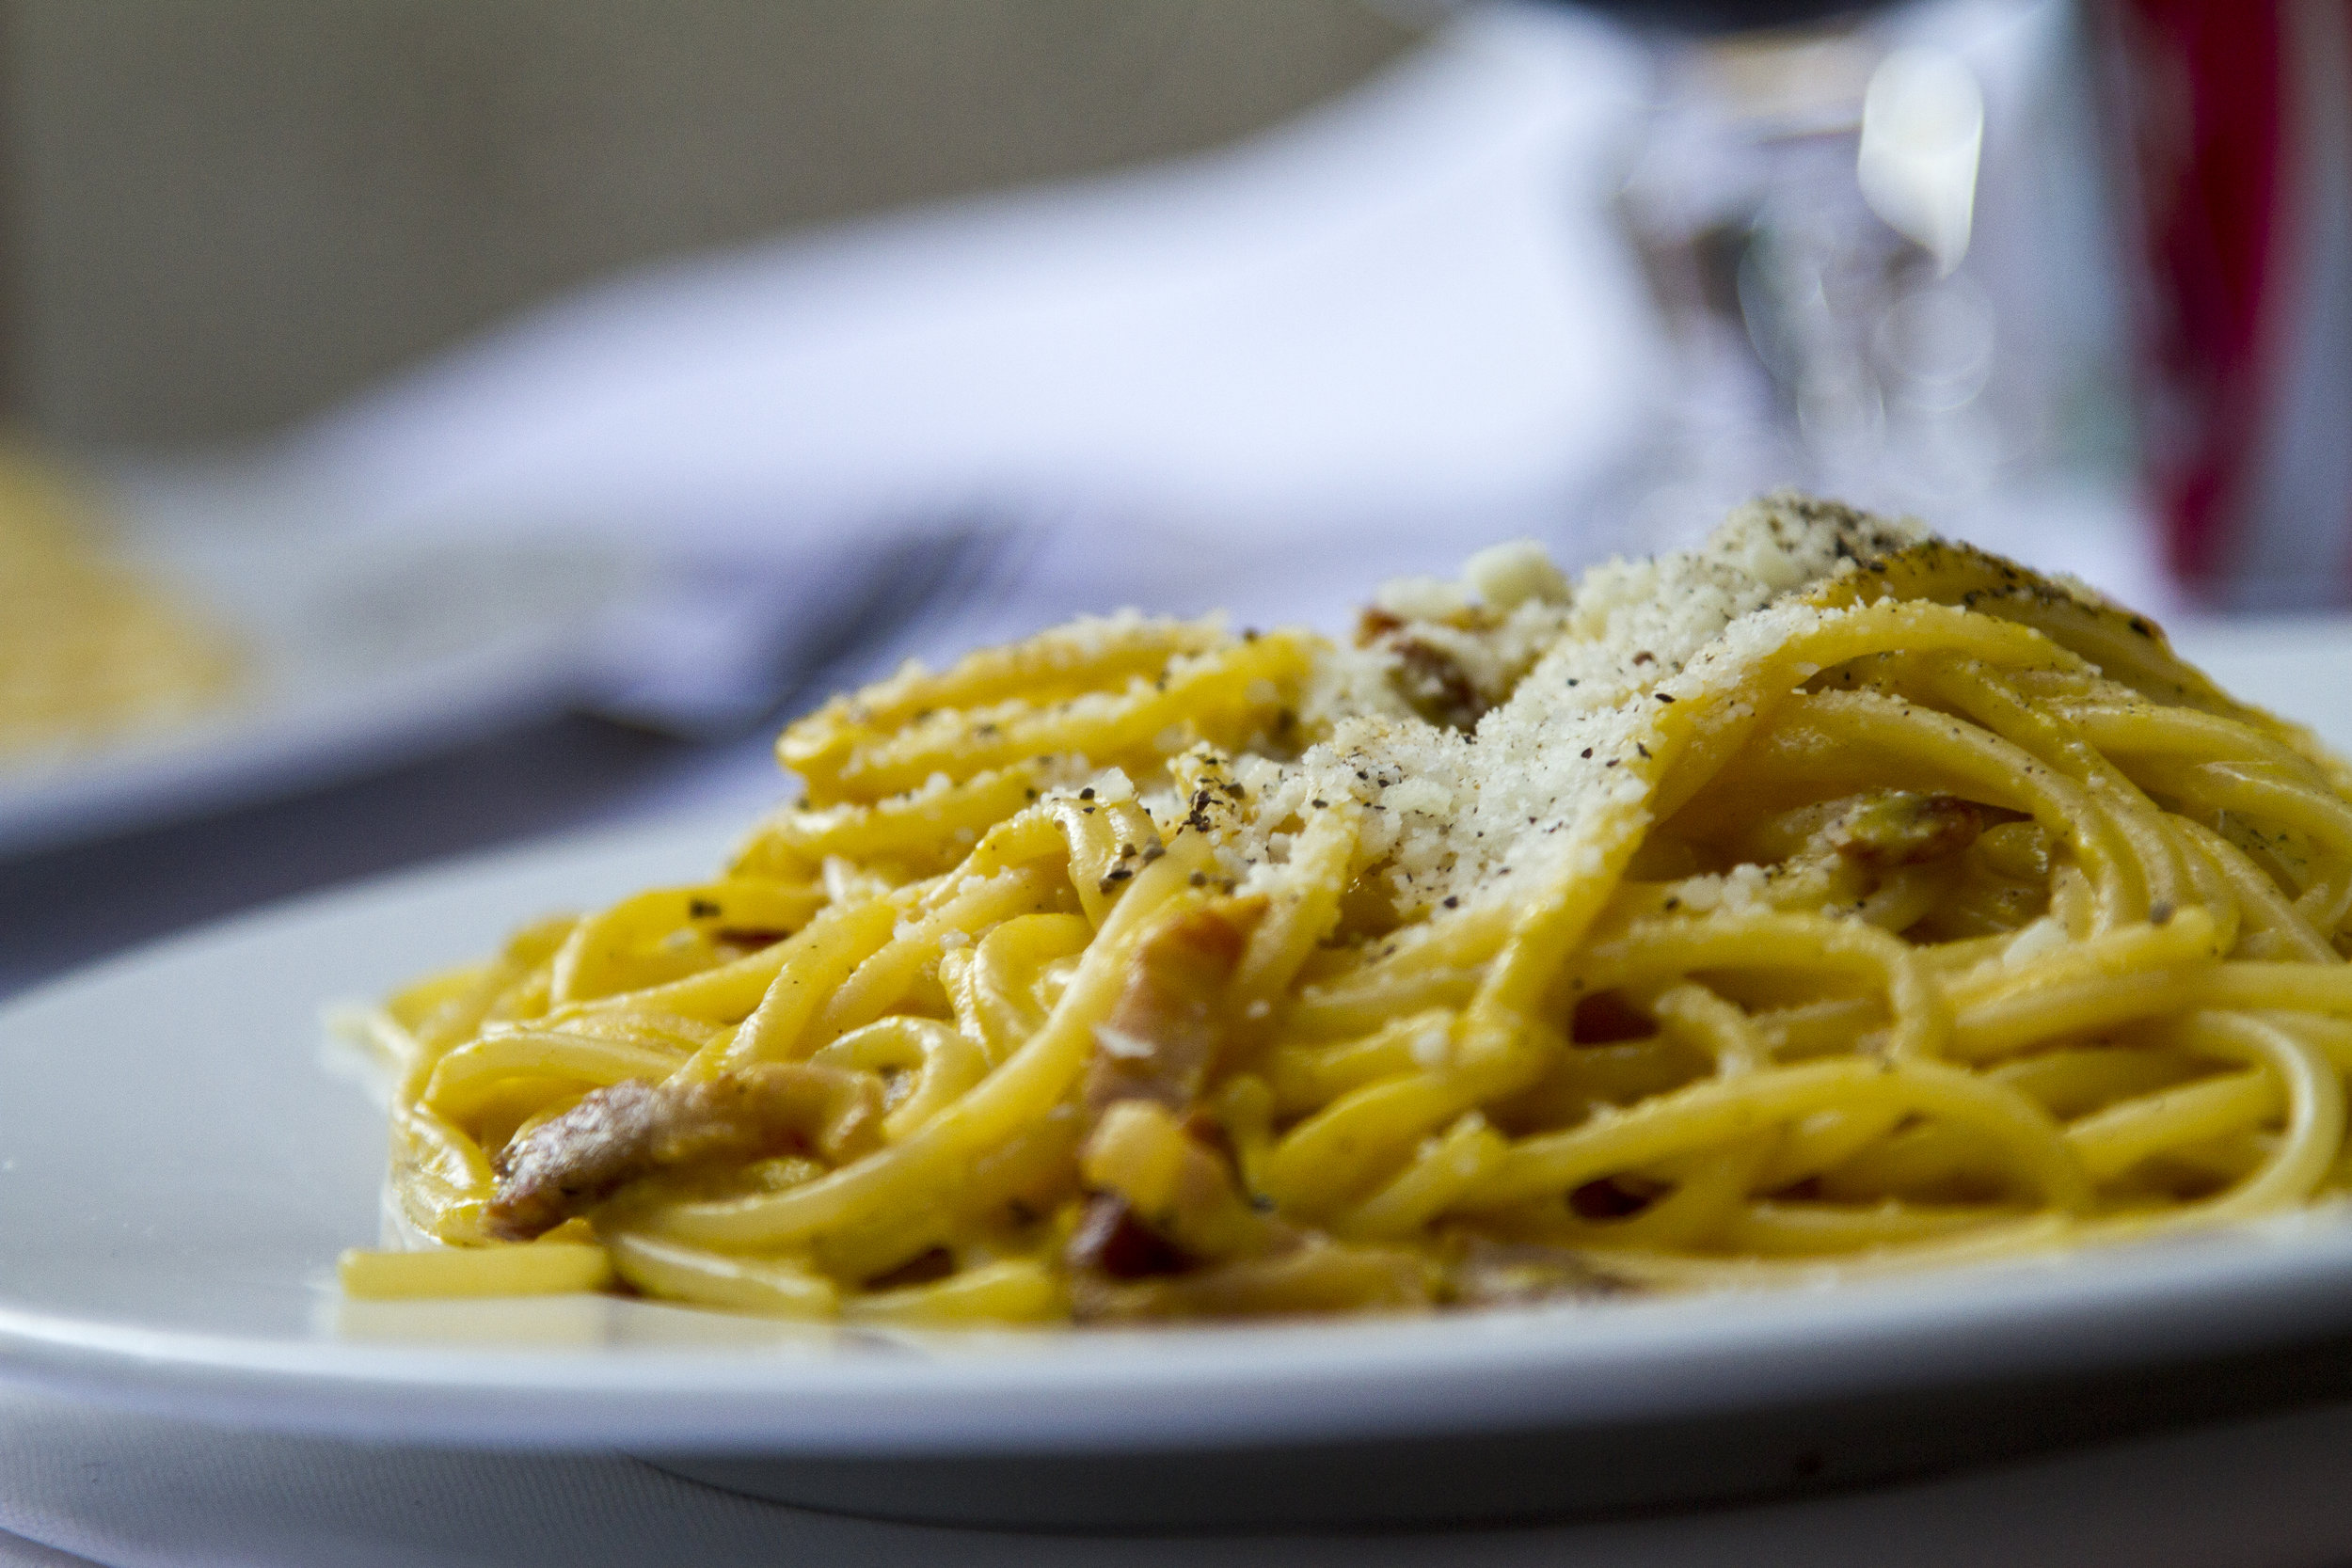
Macaroni Pie

macaroni-pie.jpg

On our table at the holidays, my family rarely remains married to any one particular dish. We don't live by rules that say we have to eat THIS on Christmas, and THIS on Mother's Day, and so on. In fact, most of our holiday meals are new recipes that just sound really good but that we would never have time or energy to make on a normal Tuesday; a porchetta that takes 2 days to marinate in the fridge or a baked french toast with homemade berry sauce would never fit into my weekday routine. This recipe, however, is the exception in being both traditional and unfancy. Macaroni Pie--which isn't a pie at all, but more a combination of spaghetti, eggs, and an ungodly amount of cheese--has appeared on our Italian family's Easter table for generations. My grandmother learned the recipe from her mother, who learned it from her mother, and so on. And with a short list of humble ingredients and a prep time that's as long as it takes for water to boil, it's proof that simplicity often wins.

We only see this recipe once a year, and I never understand why. It's a comfort food that everyone can agree on. Adults love that it tastes like a baked version of cacio e pepe.  And try arguing with your kid to taste a food that contains both Macaroni and Pie in its name. Additionally, the recipe can be made even more convenient by baking single servings in muffin tins, rather than in one baking dish as I do in the recipe below.

Either way, I hope you enjoy it!

Macaroni Pie

Serves 16

Ingredients:

1 pound spaghetti

1 dozen eggs

2 cups shredded parmesan (get the good stuff) OR pecorino romano cheese

1 tablespoon ground black pepper (Yes, that's 1 full tablespoon, but you can reduce to 2 teaspoons if you prefer)

Directions.

Preheat oven to 400 degrees. Generously butter a 9x11 inch cake dish. Set aside.

In a large pot, bring salted water to a boil and add spaghetti. Cook pasta 2 minutes less than its suggested cooking time (pasta will continue to cook in the oven).

While you're waiting for the water to boil: In a large bowl, whisk together eggs, cheese, and pepper. Add drained pasta to the bowl and mix together until combined (two forks  or tongs usually does the trick). Pour into pan and spread evenly.

Cover with foil, and bake for 35 minutes. Remove foil than bake for 10 minutes more until the top gets nice and crunchy. Let cool for 15 minutes and then cut into 16 slices.

Notes:

*This can be made up to three days in advance. Reheat, covered,  in a 350 degree oven for 10-15 minutes.

*If you're making this in muffin tins, we recommend parchment liners to prevent stickage. Also, to make filling easier, add the cooked spaghetti directly to the muffin cups and then use a measuring cup to pour the mixture over the pasta. Reduce cooking time to 20-25 degrees covered and then an additional 5-10 minutes uncovered.


10 ideas for leftover baby food purees

baby-food.jpg

It seems to happen overnight: Your baby who once devoured baby food purees decides she only wants finger foods. Once babies begin to use their pinchers, they become more interested in perfecting picking up food from their trays, rather than being spoon fed by you. The good news is that you now have two free hands during mealtime (take this as your cue to eat!). But don't toss your freezer stash of pears, peas, and parsnips!

Whether your baby is moving on to the finger food stage or is ready for more than just single-ingredient fruit and veggies, these 10 puree-based food ideas (for baby AND you!) can help your baby transition to the next stage AND ensure your leftover stash doesn't go to waste.

  1. Stir fruit and veggie purees into plain whole milk yogurt, cottage cheese, and oatmeal. It's a delicious way to naturally sweeten without adding sugar. How's that for getting in a veggie at breakfast?
  2. Add veggie purees into sauces and pestos. Bump up the nutrition and flavor of your traditional pasta toppings! Winter and summer squash, sweet potato, pumpkin and bell pepper make great additions to tomato sauce. Green purees like peas, zucchini, kale, and spinach all get disguised when stirred into pesto.
  3.  Mix veggie purees into meatballs and meatloaf. Go for up to four ounces of puree per pound of meat to boost nutrients AND add moisture. No dry balls for your baby!
  4. Dump veggie purees into soups or stews.
  5. Use them as  teethers. Frozen cubes feel good on baby's gums. Add puree cubes to a mesh teether, like these Fresh Food Feeder, 2 Pack, Blue/Green.
  6. Blend them into a smoothie. Mix fruits and veggie cubes with ice, plain yogurt, and a bit of juice or coconut water for a refreshing and healthy breakfast or snack.
  7. Make 'em into a protein-rich dip. In a food processor, combine 1 can of white beans, 1 garlic clove, 2 ounces of veggie puree, and herbs of choice. Bean dips stick well to spoons, so if baby is learn to self feed, this is less messy than drippy foods.
  8. Toss a cube of fruit puree into a glass of champagne. Just so there's no confusion, this is for you, not baby.
  9. Stir fruit and veggie purees into pancake or waffle mix or mix into a muffin recipe.  Way healthier baking!
  10. Spread leftover fruit puree on crackers or as a jelly replacement on sandwiches. Three cheers for no added sugar!


How do you use leftover baby food? Tell us your ideas!

Yes, you CAN bring back family dinner!

family-dinner.png

There's nothing more refreshing after a day full of work, school, activities, homework, meetings, and playdates than sitting down and having dinner with my family.  It's over food that we connect, talk, share and bond. That cherished family meal doesn't happen every night; for me and for most families, that would be impossible. The good news: Research shows that it only takes a minimum of 3 shared family meals per week (breakfast and lunch count, too!) to bring your family closer and make everyone healthier. How refreshing is that? For us, family meals happen mainly on the weekends when we have more time. I love to sit and chat after our plates are clean, and I always sip my wine slowly so my husband is forced to stay at the table with me! It's those meals that remind me of growing up; as a family, we always lingered around the dining table (and we still do when I visit home!). My plea to you is that you give your kids that same privilege—the payoffs of sharing a meal together are priceless, and they include .

  • Meals tend to be healthier and nutritious when they are prepared at home.
  • Children eat more fruit and vegetables when they see other family members eating it.
  • Adults and children alike are less likely to become overweight.
  • Children learn to communicate and interact better (especially in a world where everything happens online!).
  • Family meals are linked to lower levels of depressive symptoms in all family members and improved psychological wellbeing.
  • Family meals can help prevent destructive behavior, including lower rates of smoking, drinking, and illegal drug use in pre-teens and teenagers.
  • Children perform better in school.    

10 Ways to Make Family Dinners Doable, Easy, and Fun! 

1. Think about your week before your dive into the craziness of it all. Are any weeknights free of activities and doable for dinnertime together? Then set your goal to create a minimum of 3 family meals: Friday dinners, Sunday brunches, and Saturday lunch all count!

2. Plan a few meals in advance and add the ingredients to your weekly grocery list. Having everything on hand makes it much easier to whip something up without return trips to the grocery store or stressing out about what you're going to serve.

3. Turn the TV off and make it a rule that mealtime is free of all devices--your children (and you!) can survive 20 minutes without their phones or iPads!

4. Get the kids involved in cooking. Even babies as little as 1 or 2 years old can do certain tasks, such as peeling stickers off of fruit and veggies, washing them under running water, stirring, and pressing the buttons on the blender or food processor.

5. Keep meals simple. The goal is to spend quality time together--not to waste your whole night preparing something elaborate (and then feeling let down if your kids don't eat it.)

6. Create fun themes to get kids excited about mealtime: Think Macaroni Monday, Taco Tuesday, or Special Sunday Pancakes.

7. Let your child pick a recipe a week: Go to the grocery store together, gather the ingredients, and make it together. What they'll learn goes way beyond cooking: price, measurement, and more!

8. Make it enjoyable! Leave the serious discussions for later (read: no talk about Johnny's bad day at school), and let mealtime be a relaxing, calming, and comforting time.

9. Don't put pressure on the kids to eat what's on their plates. Instead, make the focus on the conversation and let the food be secondary. Nothing spoils dinner like constant pressure from parents telling their kids to take more bites.

10. Say grace and/or go around the table and have everyone say one thing they're happy about or thankful for.


What do you do to make family meals happen? Share your ideas--and inspire each other!

5 Baby and Toddler Foods That Look Healthy, but Aren't

confused-toddler-face_0-e1484590624507.jpg

It's no secret that Americans consume way too much salt and sugar, and a new study in the journal Pediatrics shows that food companies may be prepping babies' and toddlers' tastebuds early to acquire these tastes. Many baby and toddler foods--even those marketed as "healthy" or "organic" contained a gross amount of excess sugar and sodium, according to researchers from the Centers for Disease Control and Prevention (CDC) . Almost half of fruit and grain based baby food contained added sugar, and foods made for toddlers—including vegetables, wheat or whole grain-based crackers, chips, sticks, or puffs—contained the sodium equivalent of plain potato chips.

We searched out the baby and toddler food offenders that pose as health foods so that you won't be duped.

  1. BABY AND TODDLER YOGURT

baby yogurt

Yogurt is a healthy choice for toddlers, but most of the yogurts marketed for kids (yep, even the organic brands!) contain a whopping two teaspoons of excess sugar in their tiny containers—and that's not counting the natural sugar that's already present in dairy. If you're introducing yogurt to your baby for the first time, start with plain whole fat yogurt (yep, babies won't notice that it's missing sugar!). Or for kids, sweeten yogurt naturally by adding in a squirt of honey, maple syrup, or by stirring in fruit preserves or purees. For on-the-go options, look for yogurts that contain no artificial sweeteners and contain less than 2.5 grams of sugar per ounce, like the Siggi's brand.

2. VEGGIE PUFFS

puffs

The one time I bought my toddler puffs was during an airport delay  (desperate times, people!) and when I knew he'd be super squirmy on a flight and looking for snacks. But when I read the ingredients on the Sweet Potato Puffs I had just bought, I noticed that sweet potato wasn't actually an ingredient! While some puffs actually do contain sweet potato, broccoli, or kale "flour," these powders lack all the fibers of real veggies, and the nutrients from powdered vegetables may not be absorbed by the body the same way nutrients from whole vegetables are. Bottom line: Puffs should be served to kids in the same way you serve yourself refined carbohydrates: limited. For more nutritious snack choices, go for a no-sugar-added cereal, like cheerios.

3. CEREAL BARS & GRANOLA BARS

cereal bar

We get it: Kids love granola bars, and adults do too: They're easy, portable snacks that you can stick in your purse and pull out two weeks later if need be. But from a nutritional perspective, most bars contain nothing substantial but sugar--and most are so sickly sweet that they can prime your toddler's tastebuds to prefer overly sweet selections. In fact, the brands we researched contained THREE TYPES of processed sugar, unhealthy oils, and ingredient list thats way WAY longer than the front-of-box promise: "Made with real fruit and whole grains." There's nothing easier than making your own granola bars: We like to make a huge batch and freeze 'em, so they're just as convenient as anything processed, but way healthier. This five-ingredient recipe contains 0 added sugars and is made with nothing but whole grain goodness: In a bowl, combine 1.5 cups rolled oats, 1/2 cup unsweetened applesauce, 1 cup milk (any kind will do), 1 teaspoon cinnamon, and 3/4 cup raisins. Pour into parchment-lined loaf pan, and bake at 350 for 30 minutes until ingredients are set. Cool completely in the pan before cutting into squares.

4. BABY FOOD POUCHES MADE WITH SPINACH OR OTHER VEGGIES

pouch

With names like "apple-spinach" and "zucchini-pear," they have to be good, right? While pouches serve their purpose (convenient, portable, etc.), relying on them as your tot's exclusive source of fruits and veggies can backfire. Check the ingredient list: Most contain "juice concentrates," which are a sneaky key word for sugar, and list the veggie as the very last ingredient, so there's not telling how much veggie they actually contain. Lastly, to maintain a shelf life, pouches are heated to super-hot temperatures, destroying the naturally-occuring nutrients that the fruits and veggies contain. (More on that here.) Consider making your own pouches, (we love the Infantino Squeeze Station) to control exactly what goes into them, and be sure to give your kids real fruits and veggies--you may be surprised to learn what they love!

5. TEETHING BISCUITS

teething buscuit

If they were labeled as what they really are ("Cookies for babies!"), no one would buy them. Hence the marketing ploy of calling them teething biscuits, which do little else to soothe teething any more so than than the calming effect of sticking a cookie in someones mouth. For serious teething relief that tastes good too, we swear by frozen bagels, frozen mango chunks or baby carrots in a mesh teether (like this here), or big thick carrots or frozen celery sticks for babies to gnaw on under adult supervision.

Ultimate Chicken Soup

dreamstime_m_36569224.jpg

Almost every weekend during the winter, I make a big pot of soup to last my family most of the week. This chicken soup is hands-down the most popular soup in the rotation--and it's one that my kids ask for regularly. Actually, they ask for "chicken poop" since that's how my 2-year-old pronounces it, and my 4-year-old happily joins in on the fun. Ahh, boys. There's nothing more comforting than a bowl of chicken soup, and I love soups as a way to get veggies in my kids--and that doesn't involve begging them to eat a pile of broccoli on their plate. But this chicken soup come with additional health perks. Yes, it's packed with winter veggies, but we also add quinoa for extra fiber and protein, and turmeric--a spice that has powerful health and mood-boosting properties (important for the wintertime blues!). Using bone-in chicken thighs gives the soup a rich taste and makes it a bone-broth-style soup that can cure any winter sniffle.

I hope your family enjoys it as much as mine.


ULTIMATE CHICKEN SOUP

Makes 8 servings

Ingredients:

2 tablespoons olive oil

1/2 pound carrots, peeled and diced

4 stalks celery, diced

1 onion, diced

1 sweet potato, peeled and diced into 1/2 inch pieces

2 sprigs rosemary leaves, minced (discard the stems)

1 teaspoon ground turmeric

1/2 cup quinoa, rinsed

1.5 pounds organic bone-in chicken thighs

8 cups organic low sodium chicken stock (homemade or store bought)

salt and pepper to taste


Directions:

In a large soup pot over medium heat, add onions, celery, carrots, and sweet potato, and cook, stirring occasionally until vegetables are soft. (Patience is key here, since waiting for the veggies to soften is crucial for the flavor base of the soup.)

Stir in rosemary and turmeric and cook for 2 minutes more.

Pour in quinoa and top with chicken thighs. Pour in stock making sure that chicken is fully submerged. Bring to a boil, then reduce heat and simmer until chicken reaches an internal temperature of 165 degrees, around 25-30 minutes.

Using tongs, carefully remove chicken from the pot and place on a cutting board. Let cool for 10 minutes before handling. Once cooled, discard skin and bones, and chop up meat into 1-inch pieces. Return to the pot and stir until all ingredients are combines. Season with salt and pepper.

Gingerbread pancakes!

gingerbread-pancakes.jpg

With the last-minute holiday to-do list being checked off twice, it's easy to forget about what you're going to eat on Christmas morning. But having a satisfying and festive breakfast is the best way to relax, savor the moment, and power you and the kids through the rest of the day. Especially when your kids are likely to wake up before the sun. We love these gingerbread pancakes for many reasons:

-they're low on sugar and made with whole wheat flour to give you longer-sustaining energy.

-the batter can be prepared the night before (just cover with plastic wrap, making sure the plastic wrap is pressed directly onto the batter).

- cooking them will fill your home with holiday smells that bring everyone to the table.

- since pancakes require hands-on cooking time, you can use your other hand to down a much needed cup of coffee.

These pancakes can get dusted with a sprinkle of powdered sugar (place a cookie cutter shape on top to make them extra festive), or served with real maple syrup. Our only plea is to avoid imitation syrups that are loaded with high fructose corn syrup. The real stuff isn't refined so it won't cause as dramatic a blood sugar spike and crash--and the real stuff is so sweet that you can actually use way less--a tablespoon is plenty! Serve with fruit and eggs or breakfast sausage to add in fiber and protein and round out the meal. And coffee. Lots of coffee.

Another bonus: The dry mix (from whole wheat flour through brown sugar) makes a great holiday food gift if you're short on time and don't feel like baking. Procrastinators, rejoice!

GINGERBREAD PANCAKES 

(makes 10 pancakes)

Ingredients:

1 cup whole wheat flour

1 tablespoon baking powder

1 teaspoon ground ginger

¾ teaspoon ground cinnamon

¼ teaspoon ground nutmeg

¼ teaspoon salt

2 tablespoons brown sugar

1 cup milk

1 egg

2 tablespoons butter, melted and cooled slightely

2 tablespoons molasses

Directions:

In a large bowl, whisk together the dry ingredients: flour, baking powder, ginger, cinnamon, nutmeg, salt, and brown sugar.

In a small bowl, combine the we ingredients: milk, egg, molasses, and butter.

Pour wet mixture into the flour mixture and stir just until the mixture is fully combined. Do not over mix.

Heat a non stick pan over medium-low heat. Grease pan with butter or non stick cooking spray. Using a 1/4 cup measure, pour batter onto griddle and cook without touching for 2 minutes or until the top of the pancake starts to bubble. Flip, and cook for 1-2 minutes more until both sides are golden brown. Repeat until all pancakes are cooked.

Homemade elderberry syrup--plus downloadable recipe card

FullSizeRender-2.jpg

Welcome to the season of gifting, also known as the season of "What the heck do I give my kid's teachers?" Even more complicated is that most kids in daycare or preschool have like 10 teachers in their classroom (damn you, excellent teacher-studio ratio!) so buying gifts for every.single.one-of-em can add up to another month of tuition. You could do another mug (I'm sure they have NONE of those) or a tray of cookies that they'll secretly curse you for as they eat their feelings over their terribly behaved students (not yours, I'm sure). Or you could do this gift that was inspired by my own son's drop off and seeing kids walk into his classroom with barking sounding coughs and runny noses:

The Ultimate Flu and Cold Fighting Kit.

Its contents include things they'll actually need: items that keep them healthy when they're surrounded by dozens of germy toddlers. Some ideas for a kit can include:

We take elderberry syrup every morning for its potent cold and flu fighting powers. Dried elderberries are known to boost the immune system, and one study even found that elderberry syrup, taken daily, was as good at preventing the flu as the flu shot! That's some powerful stuff. Most naturopaths recommend taking 1 teaspoon a day for adults (or 1/2 teaspoon a day for kids), and then upping that to 2-3 times a day if you feel a cold coming on.

You could easily buy elderberry syrup at your local health food store or online (such as Gaia Herbs Black Elderberry Syrup, 5.4 Ounce), but it's much more cost efficient (and easy enough) to make your own at home. (And if you're looking at multiple teachers), you could make 10 bottles for the cost of 1 bottle that you'd buy at the store.

Elderberry syrup will last in the refrigerator for about 2 weeks, but I prefer to freeze in ice cube trays. Because it's a syrup, they don't freeze completely solid, so you can scoop out a half a cube each morning. I add them to my kids' smoothies or orange juice and I take mine straight from the spoon. For teachers, you could place syrup in small mason jars and include the downloadable file to include in your kit (scroll down to the end of the post to view).

Important Note: Because this homemade elderberry syrup contains honey, it should not be given to babies under age 1!

RECIPE: Homemade Elderberry Syrup Makes 4 Cups

Ingredients: 2/3 cup of dried elderberries. These are hard to find in store so we buy this brand on Amazon:  Viva Labs Organic Elderberries, 1 lb Bag - The ULTIMATE Superfruit for Defense Syrups and Longevity Teas

3 1/2 cups water

1 cup honey such as Nature Nate's 100% Pure, Raw and Unfiltered Honey, 32 Ounce

1 teaspoon cinnamon

Directions:

Pour water, elderberries, and cinnamon into a saucepan and bring to a boil. (Do not add honey at this stage--it will burn!)

Once boiling, reduce heat and simmer for about 40 minutes until the liquid is reduced by half.

Remove from heat and let cool. Mash the berries using a spoon or potato masher, then pour elderberry juice through a fine mesh strainer into a bowl, pressing on the berries to get all the extra juice.

Whisk in honey until combined. Pour syrup into mason jars and store in the fridge for up to two weeks or in the freezer for up to 3 months.

elderberry-syrup


30+ (Healthy!) First Finger Food Ideas

child-1528308_1920.jpg

  Finger foods are your baby's first step in the transition to table food—and let's face it: Without the need to spoon feed, you now have two hands free during meal time (score!). But many packaged finger foods that are made specifically for this toddler stage are loaded with salt and sugar, according to a recent study. Ugh! Step away from the teething crackers and pick up these nutrient- and flavor-packed choices:

FRUIT AND VEGGIES! {veggies} - steamed cut up carrots - frozen mixed veggies, defrosted - steamed chopped broccoli or cauliflower - cut cooked green beans - diced cooked squash or sweet potato - diced steamed zucchini or summer squash

{fruit} - halved blueberries - avocado chunks rolled in wheat germ or ground flaxseed for easier pickup - banana slices rolled in wheat germ or ground flaxseed for easier pickup - small chunks of peaches, plums or mango - small dices of melon - steamed apple or pear dices

HIGH PROTEIN OPTIONS {beans (when buying canned, go for organic or low sodium, and always rinse)} - small white beans - cooked lentils - black beans - small pink beans {meat, fish, and eggs} -scrambled eggs cooked in butter - flaked salmon - shredded chicken - cut up meatballs {misc.} - tofu cubes - shredded cheese or cheese cubes

HEALTHY CARBOHYDRATES - homemade muffins, cut up - frozen whole wheat bagel (great for teething!) - cheerios or other whole grain no-sugar-added cereal - cooked whole grain pasta (top with tomato sauce or a veggie puree) - plain waffles or pancakes, cut up


6 Things You Might Not Know About Jarred Baby Food

puree-buffet.jpg

One of the most common questions I get asked about baby food is this: “Why should I make my own? Isn’t jarred food the same thing?” The truth is that while the ingredients might read the same as what you’d use to make at home (like carrots and water, for example), there are many major differences that aren’t always so noticeable. These five truths about jarred baby food are truly shocking.

  1. The baby food you’ve purchased may have been sitting on the shelf since before you were even pregnant. The expiration date of jarred baby food is often years away, and to enable that shelf life, jarred baby food is cooked at extremely high temperatures—a process that removes many of the nutrients.
  1. Jarred baby food doesn’t actually taste like what it claims to be. Do this test at home: Remove the label from the jar, and do a taste test to guess what vegetable or fruit you’re eating. Tough, right? That’s because the high temperature processing affects the flavor and texture of the food, making it difficult to differentiate the food by taste alone. As a parent whose goal is to get my kids to eat a diet full of fruits and veggies, giving them a taste of what fruits and veggies really taste like is crucial to start them off on the right track.
  1. Additives are often present. You’ll often see ascorbic or citric acid on the ingredient list of organic and conventional baby foods. When the jars are heated to high temperatures to preserve shelf life, it results in a loss of vitamins and nutrients in the food. To combat this, baby food companies add in artificial forms of vitamin C that come in the names of ascorbic or citric acid so the jars aren’t totally devoid of the nutrients they’re supposed to naturally contain.
  2. BPA is used in many brands to coat the lids of jarred baby food. Metal lids can contain Bisphenol A, which is especially dangerous to infants whose immune systems are weaker and less able to rid the body of toxins. A study published in Environmental Health Perspectives found that widespread exposure to BPA may result in levels of up to 11 times higher in infants than in adults.
  3. They’re sneaky about sugar. Just because an ingredient label doesn’t read “sugar” doesn’t mean it’s not there. Look for sneaky sources of sugar including any sort of “juice concentrate” which are often added to sweeten up mixed fruit and veggie pouches and jars—even ones labeled as “natural”. Other sneaky sugar sources to seek out: fructose, malt extract, any type of syrup, or any ingredient ending in “ose” like fructose.
  4. They're swimming in pesticides. A recent study of jarred baby food found that one measly jar of peaches contained 22 varieties of pesticides! Apples, pears, and green beans also contained more pesticides per jar than would legally be allowed on the shelves of European grocery stores. (American companies aren’t required to follow strict regulations.)

The bottom line is that when you buy food from a store shelf, it’s impossible to know everything that goes into it, and making your own baby food (and using organic fruits and veggies when available), is THE BEST WAY TO know exactly what’s going into your baby’s belly.


Mini Stuffing Bites

stuffing-bites.jpg

Why, I ask you, is stuffing limited only to Thanksgiving? This post is my plea to make Thanksgiving's best side dish extend throughout the winter. It's the ultimate comfort food--and this version redeems itself by containing also veggies and a fruit (and, ahem, sausage and butter).  I love these bite sized versions for many reasons:

  1. It's a universal rule that applies to 99 percent of kids across America: Bake anything in a muffin tin, and they're more likely to try it.
  2. These can can be made ahead and even stored in the freezer, so you can pop one out anytime—they make a great addition to your child's lunch boxes, or as a size to any meat-based dinner, or as an adorable party appetizer.
  3. Portion control. If you're the type that will go at the leftover stuffing with a spoon and without a stop button (insert self), these smaller versions can help reign it in.

Mini Sausage and Apple Stuffing Bites

Makes 24 Muffin Size Bites

Ingredients: 1 baguette cut into 1-inch cubes, about 8 cups 1 tablespoon butter 2 tablespoons olive oil 2 sausage links, castings removed (or 1 cup ground sausage) 2 apples, chopped 1 small yellow onion, diced, about 1 cup 4 celery stalks, diced, about 3/4 cup 2 teaspoon minced fresh thyme 2 cups organic low sodium chicken stock 3 large eggs, beaten ½ cup dried cranberries, optional

Directions: Preheat oven to 350 degrees. Grease 2 muffin tins or line with parchment liners. Set aside Place bread cubes onto cookie sheet, and cook in the oven for 8-10 minutes until toasted. In a large skillet over medium heat, sauté sausage in butter and oil until cooked through, about 5-7 minutes. Add apples, onions, celery, and thyme and sauté for 8-10 minutes more, until onion is translucent and celery is soft.  Remove from heat. In a large mixing bowl, stir together sautéed ingredients, bread cubes, chicken stock, eggs, and cranberries and toss to thoroughly combine. Spoon the stuffing mixture into greased muffin tins, filling all the way to the top. Pat the mixture down to pack it well. Bake for 25 minutes until bites are golden. Serve warm or at room temperature.

Pasta with Butternut Squash Sauce

IMG_3604.jpg

I know you've got strong biceps from carrying that baby around all day. Or from lugging all the things that your toddler refuses to carry. You'll need those muscles to cut through a butternut squash! But if you're not feeling up for the challenge, here area few shortcuts:

      1. The most economical way to purchase a squash is to buy them whole, so if you're chopping the whole darn thing, here's the simplest way to cut through it: Cut the squash in half lengthwise, scoop out the seeds, peel with a vegetable peeler, then chop into pieces. But here's a hint to make it even easier. With a fork, poke 10 deep holes into the squash, then throw it in a microwave for 5 minutes before cutting through. Thank me later.
      2. Buy it pre chopped--fresh or frozen. The lazy woman's choice (and often mine--I don't judge.)

If you have a picky eater, this is a great recipe that introduces him to something new (squash sauce), but also has familiar elements (spaghetti), and that familiarity ups the chances that they'll try it without some sort of epic meltdown. Win!

Pasta with Butternut Squash Sauce

Makes 6 adult servings

Ingredients: 3 tablespoons organic unsalted butter 8 fresh sage  leaves, finely chopped 1 yellow onion, chopped 2 garlic cloves, chopped 2.5-lb. butternut squash, peeled, seeded, cut into ½” pieces OR 3 cups of butternut squash puree 2 cups organic low-sodium chicken broth ½ cup grated parmesan cheese salt and pepper 1 box whole wheat spaghetti

Directions: 1. Heat butter in a large deep skillet over medium heat. Add sage, onion, and garlic, and sauté until onion is translucent, around 8-10 minutes. Add butternut squash and broth. Bring to a boil; reduce heat, cover and simmer until squash is fork tender, around 15 minutes. Puree mixture using a food processor or immersion blender (Careful: The mixture will be hot). Return to original skillet and stir in cheese. Season to taste with salt and pepper. 2. Cook pasta in a large pot of salted boiling water until just al-dente (or about 2 minutes less than the suggested cooking time). Transfer pasta and 1 cup of pasta water to squash mixture and cook over medium heat for 2 minutes more, tossing so that the pasta is completely mixed with the puree. Add more pasta water as needed. Serve immediately.

Slow Cooker Applesauce

dreamstime_m_45645993.jpg

Nothing makes the house smell quite like fall than the smell of cinnamon and apples slowly cooking all afternoon. I admit that I'm not one that often pulls out my slow cooker. Most of the good recipes I find require too many steps that, for me, eliminate the convince factor of using a slow cooker at all: searing meat and sautéing veggies before adding them to the pot. But this is worth my pulling out the heavy appliance, mainly because this recipe is a one step wonder: Just throw everything in, set it on high for four hours, and let the apples break down slowly to fill your house cinnamon-sweet smells.

From there, my four year old loves the job of official apple masher. I give him a potato masher and let him get to work! (makes 4 cups)

Directions:
Combine the following ingredients in a slow cooker: 3 pounds of apples, peeled, cored, and chopped into 1 inch pieces; 2 cinnamon sticks; 1 tablespoon lemon juice; 1/2 cup water; 1/4 cup pure maple syrup (optional). Cook on high for 4 hours, stirring once or twice. Remove the cinnamon sticks, then use an immersion blender or potato masher to puree the applesauce. Store in the refrigerator for up to 4 days or freeze for up to 3 months.