
Protein-Packed Overnight Oats
/
This family-friendly make-ahead breakfast gives you all the protein you need to fuel you until lunchtime!
Read More
This family-friendly make-ahead breakfast gives you all the protein you need to fuel you until lunchtime!
Read MoreKids love to dip! This flavorful white bean dip is packed with satiating protein and fiber and perfect for dipping pita and veggies!
Read MoreCreate a DIY parfait bar with this crunchy, hearty granola that’s loaded with dried sweet cranberries, filling pumpkin seeds, and delicious coconut! Just add yogurt and fruit for a balanced breakfast!
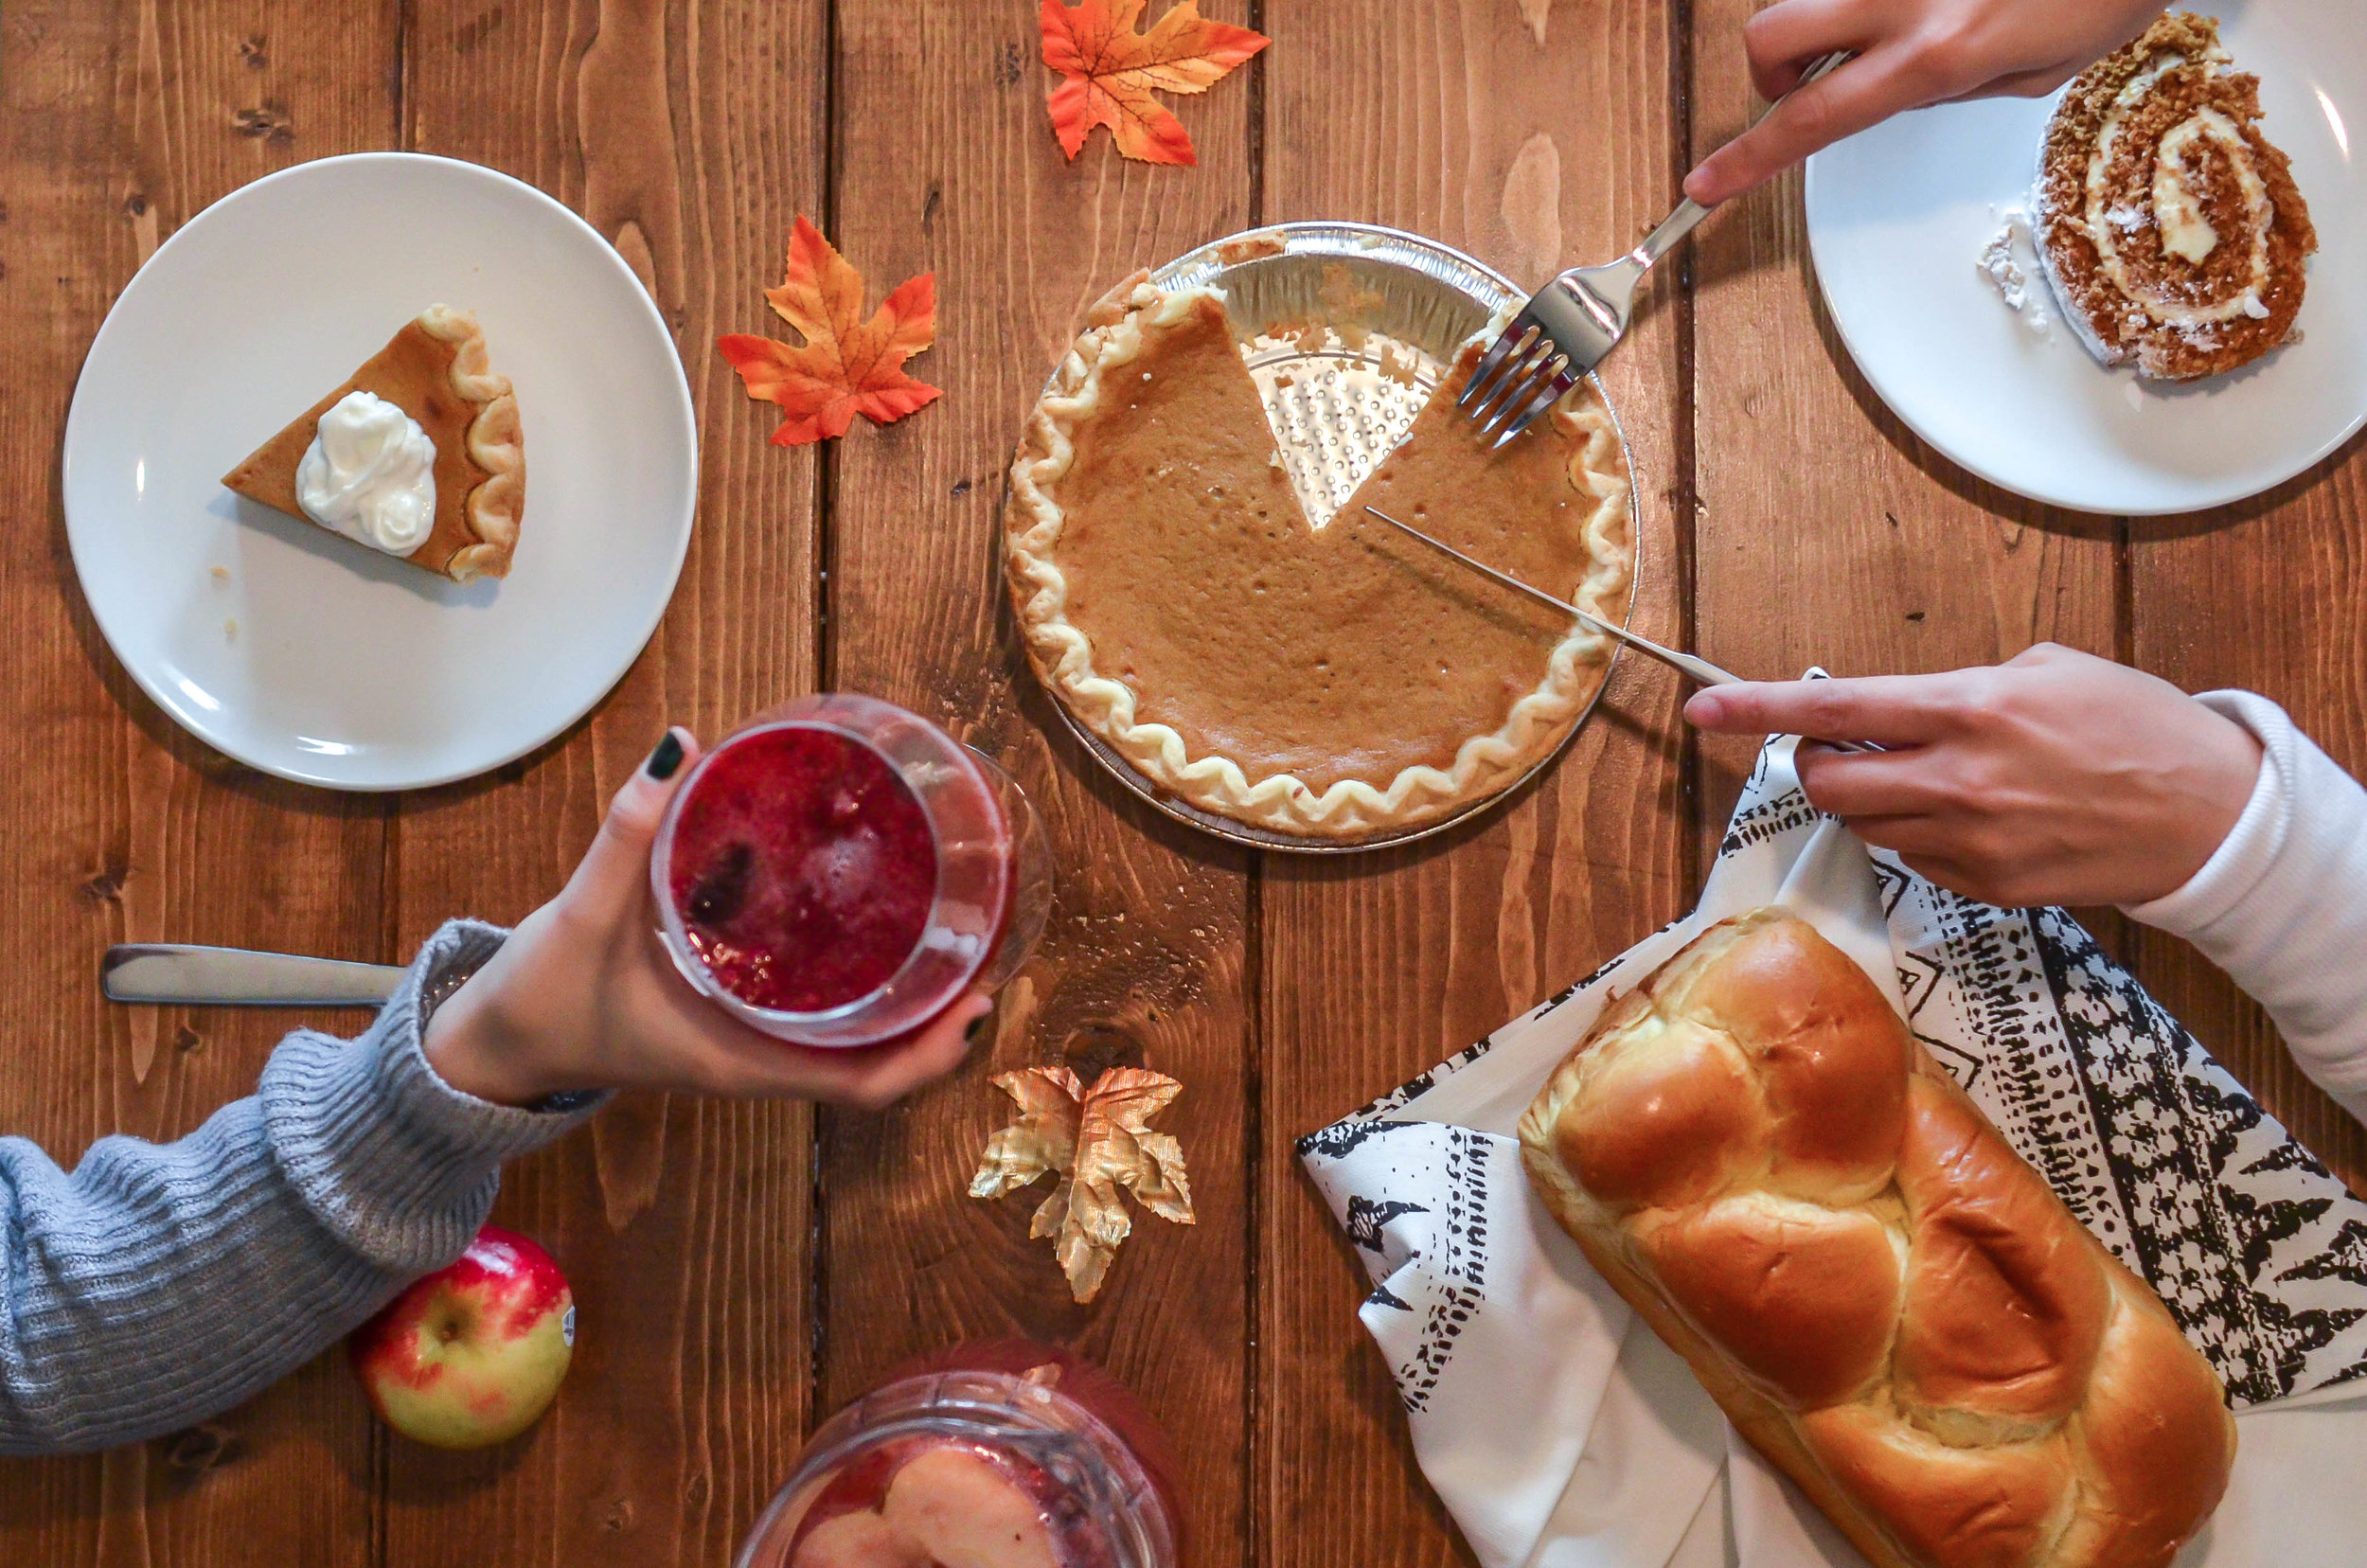
Read MoreDo your kids stick their nose up at their holiday meal? Here’s how to get your kids to actually eat more than bread and dessert.
Read MoreOverhead Cheesy Chili Corn Chowder with corn chips and bowls and spoons

It's hard to believe that we're already halfway through our What's Up World series! This week, we landed in Italy, and the pressure to perform is really on. For one, the majority of my background is Italian. And also, we live in a city with a heavy Italian influence. It's a place where older ladies line up outside the Italian deli on Saturday mornings to buy fresh-baked focaccia bread, where masses are said in Italian on Sundays, and where names like Frank Sinatra and the Cake Boss hail from. As we began reading through the book about Italy, I felt distracted, wondering what kind of food we would cook from the country. It was too hot for heavier Italian fare, and pizza was out of the question because we admittedly eat it too much. A quick search had me counting 22 pizza parlors within a 1 mile radius of our home. Luckily, the book helped me decide. The school aged narrator began her day as most children do in Italy with a breakfast full of cookies, cakes and bread. You can imagine the initial excitement from my kids as they read this—a response that was soon followed by the realization of the unfairness of it all. Why do THEY get to eat cake for breakfast and we don't?
"My dear children," I said as I wrapped my arms around them and pressed them closer to me. "One day when you're a parent like me, you can drop your kids off at school, go straight to the coffee shop, and eat the biggest and the best breakfast pastries every single morning. And you can eat the whole thing by yourself without anyone asking for a bite. Didn't you know that's what mommy does while you're at boring school? I eat cake all day long."
Okay I didn't actually say that, but a part of me may have taken the smallest pinch of pleasure in watching their reaction to this imaginary tale. So instead, I said yes, that we can make a dessert, but that we would eat it after dinner. And so we went to it.
We went with a lemon semifreddo--an ice cream-like dessert that requires no ice cream maker, which is good, because I don't have one. Traditionally, to make a semifreddo, you would line a loaf pan with plastic wrap and pour the mixture inside the pan until it's frozen. Then you simply lift out the mold, unwrap it from the plastic, and be left with a beautiful rectangular cake. For our version, we went with individual glass ramekins so there would be no fighting over who got the bigger slice, and also because of that wonderful unknown that comes with giving children something glass and holding your breath that it won't break. Also, aren't they pretty?
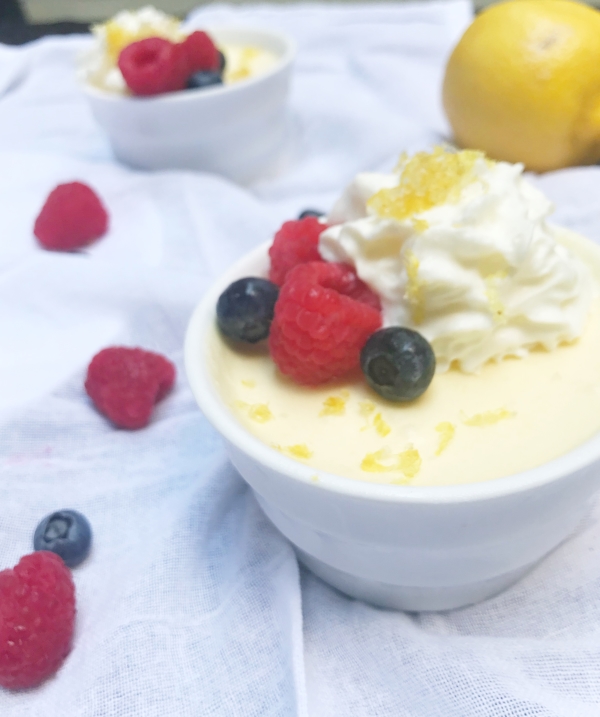
Lemon desserts transport me back to the last time I was in Italy--it was a few months before I got pregnant with my oldest child and my husband and I had gone to the coastal city of Positano where lemons grow as big as melons. This dessert would give us the opportunity to tell the kids about the trip, and maybe even remind my husband that our 10 year anniversary is coming up and that a trip back to Italy would be a lovely present that I would think that I wanted until I boarded the imaginary plane sobbing about the potential dangers that could occur overseas and away from our children.
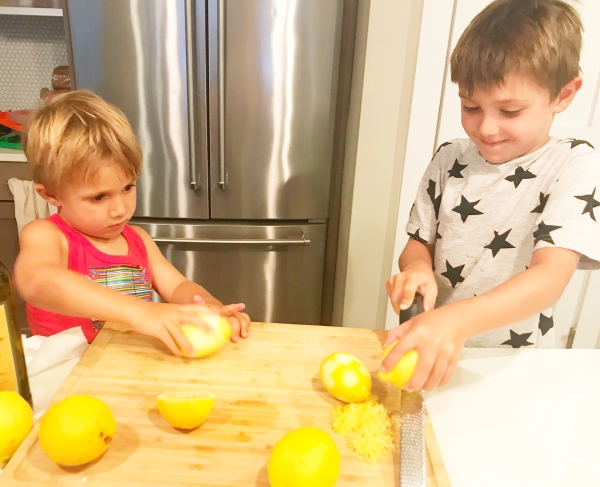
But back to real life in my kitchen. For this recipe, the kids took turns using the electric mixer and I stressed to them that the beaters always had to touch the bottom of the bowl, unless they wanted a sugar explosion all over the kitchen, which in retrospect, they wouldn't have minded. With my assistance, they learned to hold the bowl steady with one hand and hold the beater in the other. They also enjoyed squeezing the lemon juice and sucking on the remaining peel. Do any of your kids like eating lemon as much as mine do?
Overall, the hardest part for this recipe was patience in waiting for the ice cream to harden and in keeping the freezer shut long enough so that it would--they loved sneaking peeks! And as you can imagine with any recipe that uses sugar as the main ingredient, the kids loved every last lick that they could get. My husband and I still have no international travel plans, but I would otherwise say that our trip to Italy was a success!
Be sure to join us next week as we fly to South Africa!
makes 8 6-ounce ramekins or 1 9x5x3 loaf pan
Ingredients:
2 1/4 cups heavy whipping cream
1 tablespoon confectioners sugar
1 1/4 cups granulated sugar
7 large organic egg yolks
1/2 cup fresh squeezed lemon juice (approximately 4-5 lemons)
1 1/2 tablespoons lemon zest
1/4 teaspoon salt
2 cups mixed berries
Directions:
Using electric mixer, beat whipping cream in large bowl until soft peaks form. Transfer all but 1 cup of whipped cream into a separate bowl and refrigerate. Add confectioner's sugar to the remaining whipped cream and beat for 1 minute more. Place the sweetened whipped cream in the refrigerator.
In a large glass or metal bowl, whisk together granulated sugar, egg yolks, lemon juice, lemon and salt. Set bowl over a large saucepan of simmering water and whisk constantly until mixture registers 170°F, about 4-5 minutes. Carefully remove bowl from the saucepan and place it on the countertop. Using an electric mixer, beat mixture for at least 5 minutes until cool and thick. Fold in UNSWEETENED chilled whipped cream. Divide mixture evenly among ramekins and freeze at least 8 hours. Once ready to serve, dollop semifreddo with sweetened whipped cream and fresh berries.

Every summer, I like to torture myself bond with my children by forgoing camp and keeping them home with me to create our own fun. I begin the summer with a picture perfect vision of the upcoming 12 weeks. In the mornings, we’ll practice Spanish and reading and penmanship. There will be weekly tennis lessons, trips to museums and waterparks, and picnic baskets filled with hydrating snacks like sliced cucumbers and watermelon, because one can never be too hydrated on scorching summer days. Then summer happens, and by day three our Spanish lessons turn into YouTube episodes of Paw Patrol en espanol—not like we can hear the language over the cries of I just want regular Paw Patrol—and reading only gets done when I pay my 6 year old actual money to read something—A…N…Y…T…H…I…N…G. And I quickly realize that tennis rackets would only be used by my boys to beat each other, because every object in our home has somehow transformed into into a tear-producing weapon.
So it’s only natural that I’m here to document our new summer project and ask you to join in on our family fun. We will play and read and eat and learn. Welcome to the What’s Up World Series. Here’s how it works:
Every week, our family will read a different book about a country (we’re reading the Living In Around the World Collection), but you could visit your local library and pick any book about the culture.To start, we'll make stops in Brazil, India, Mexico, China, Italy, and South Africa. My 6 year old will have a chance to practice his reading, but parents of younger kids can read the book to their children, and we’ll all locate the country on the globe. Then together we’ll make a recipe from that country that’s suitable for all ages (my kids are 1, 3, and 6, so this can be something we all can eat.). I will post our recipes and stories every Thursday, and we’ll eat through a total of 6 countries this summer. I’ve always found that cooking with my children is the best way to get them to eat what I’m making, and this will introduce new flavors and expand their palates in a way they can get excited about. Oh and let me not forgot about the beautiful bonding that unites siblings when they cook together. Parents of two kids or more can watch their darlings yank measuring spoons out of their sibling's hand exchange pleasantries like "It would make me happier if you go first, sister."
And the benefits just keep coming: there’s reading, there’s geography, there’s food, there’s culture, there is the insanity of embarking on a new family project and not knowing where it will take you. The adventure begins June 28--first stop: Brazil!

Back in 2012 when I first started teaching baby food cooking classes, a client of mine mentioned that her husband had been making chocolate avocado pudding, and that her baby was gobbling it right up. I put the idea on my imaginary list of recipes that I wanted to recreate, and then—-like every other item on my to-do list that I write in my head but never on paper—I completely forgot about it. Fast forward five years when that baby of hers is ready to graduate kindergarten, and here I am in my kitchen finally checking off this recipe. Do I regret not trying this sooner? Yes, but mostly because recently when I pay for avocados at checkout, I have to do a doubletake (2 for $5--seriously?!) and then you get home, cut it open, and it's all pit. Five years ago, if I can remember correctly, the world was a cheaper place for avocados, and hashtags like #avocadoproblems and #avocadofail and #willworkforavocados (okay fine I made that last one up), were not yet a thing.
But I digress.
In truth, this recipe was a real win for the kids, and I already am thinking ahead to tweaking the recipe for avocado-chocolate fudgsicles this summer (stay tuned!). The avocado creates a perfectly creamy texture and a blank slate that lets the chocolate from cacao powder and semi-sweet chocolate chips really shine through. It comes together in minutes after a whirl in a food processor or blender, and since it's made without refined sugar, it's a treat that I'm happy to serve my kids regularly. Also, unlike every other avocado recipe in the world, this can be made up to 24 hours in advanced and stored in the refrigerator. Because of the chocolate, there's no telling if the avocado turns brown.
Finally, another perk to this recipe is that it's allergy friendly--perfect for friends who are allergic to milk or eggs. But everyone will love it!
CHOCOLATE AVOCADO PUDDING makes 4 servings Ingredients: 2 medium ripe avocados 1/2 cup semi sweet chocolate chips 1/4 cup cacao powder* 1 tsp pure vanilla extract 1/4 cup milk (cows, almond, coconut, or even water) pinch of salt 1/4 cup pure maple syrup Directions: In a microwave safe bowl, melt chocolate chips according to package directions. Cool for a few minutes, then add them to a food processor or blender with the remaining ingredients. Blend until no lumps remain, pausing to scrape down the sides of the bowl. Transfer mousse to a bowl, cover with plastic wrap, and chill for at least 20 minutes (or up to 24 hours before serving.
*I use cacao powder instead of cocoa powder because it is much less processed than cocoa powder and it contains a crazy high amount of fiber, nutrients, antioxidants and magnesium. You can find it in the same location in the grocery store as traditional cocoa powder. Yes, it's more expensive, but we use it sparingly enough that it's worth it for us.
Perfect for Valentine’s Day, these pretty pink pancakes get their rosy hue from dragonfruit!
Read More
It's so hard to believe that a full year has gone by since our baby Mae was born. She's brought pure joy into our lives because of her happy spirit and the way in which she turns her two older brothers into mushy love balls when they're around her. Baby love is the sweetest and most innocent love--that's for sure! Mae has been a great eater since I introduced her to real food at around 6 months old, and I'm cherishing this stage of feeding; she's too young to talk back or have an opinion, and she happily gobbles up everything I put in front of her. I know this stage is fleeting, so I'm enjoying every mealtime moment!
And when it came to making her first birthday smash cake, I wanted to give her something that was both delicious, but that didn't have any artificial yucky stuff like fake coloring or refined sugar. In fact, this cake is free of oils, butter, refined sugar, and food dyes. Instead, it's sweetened with lots of fresh fruit and a touch of pure maple syrup. The result is cake that has more of a muffin-like consistency--it's certainly not light and fluffy, but it IS sweet and delicious. I used cake flour for the batter, but you could easily substitute the same amount whole wheat, white whole wheat, or oat flour.
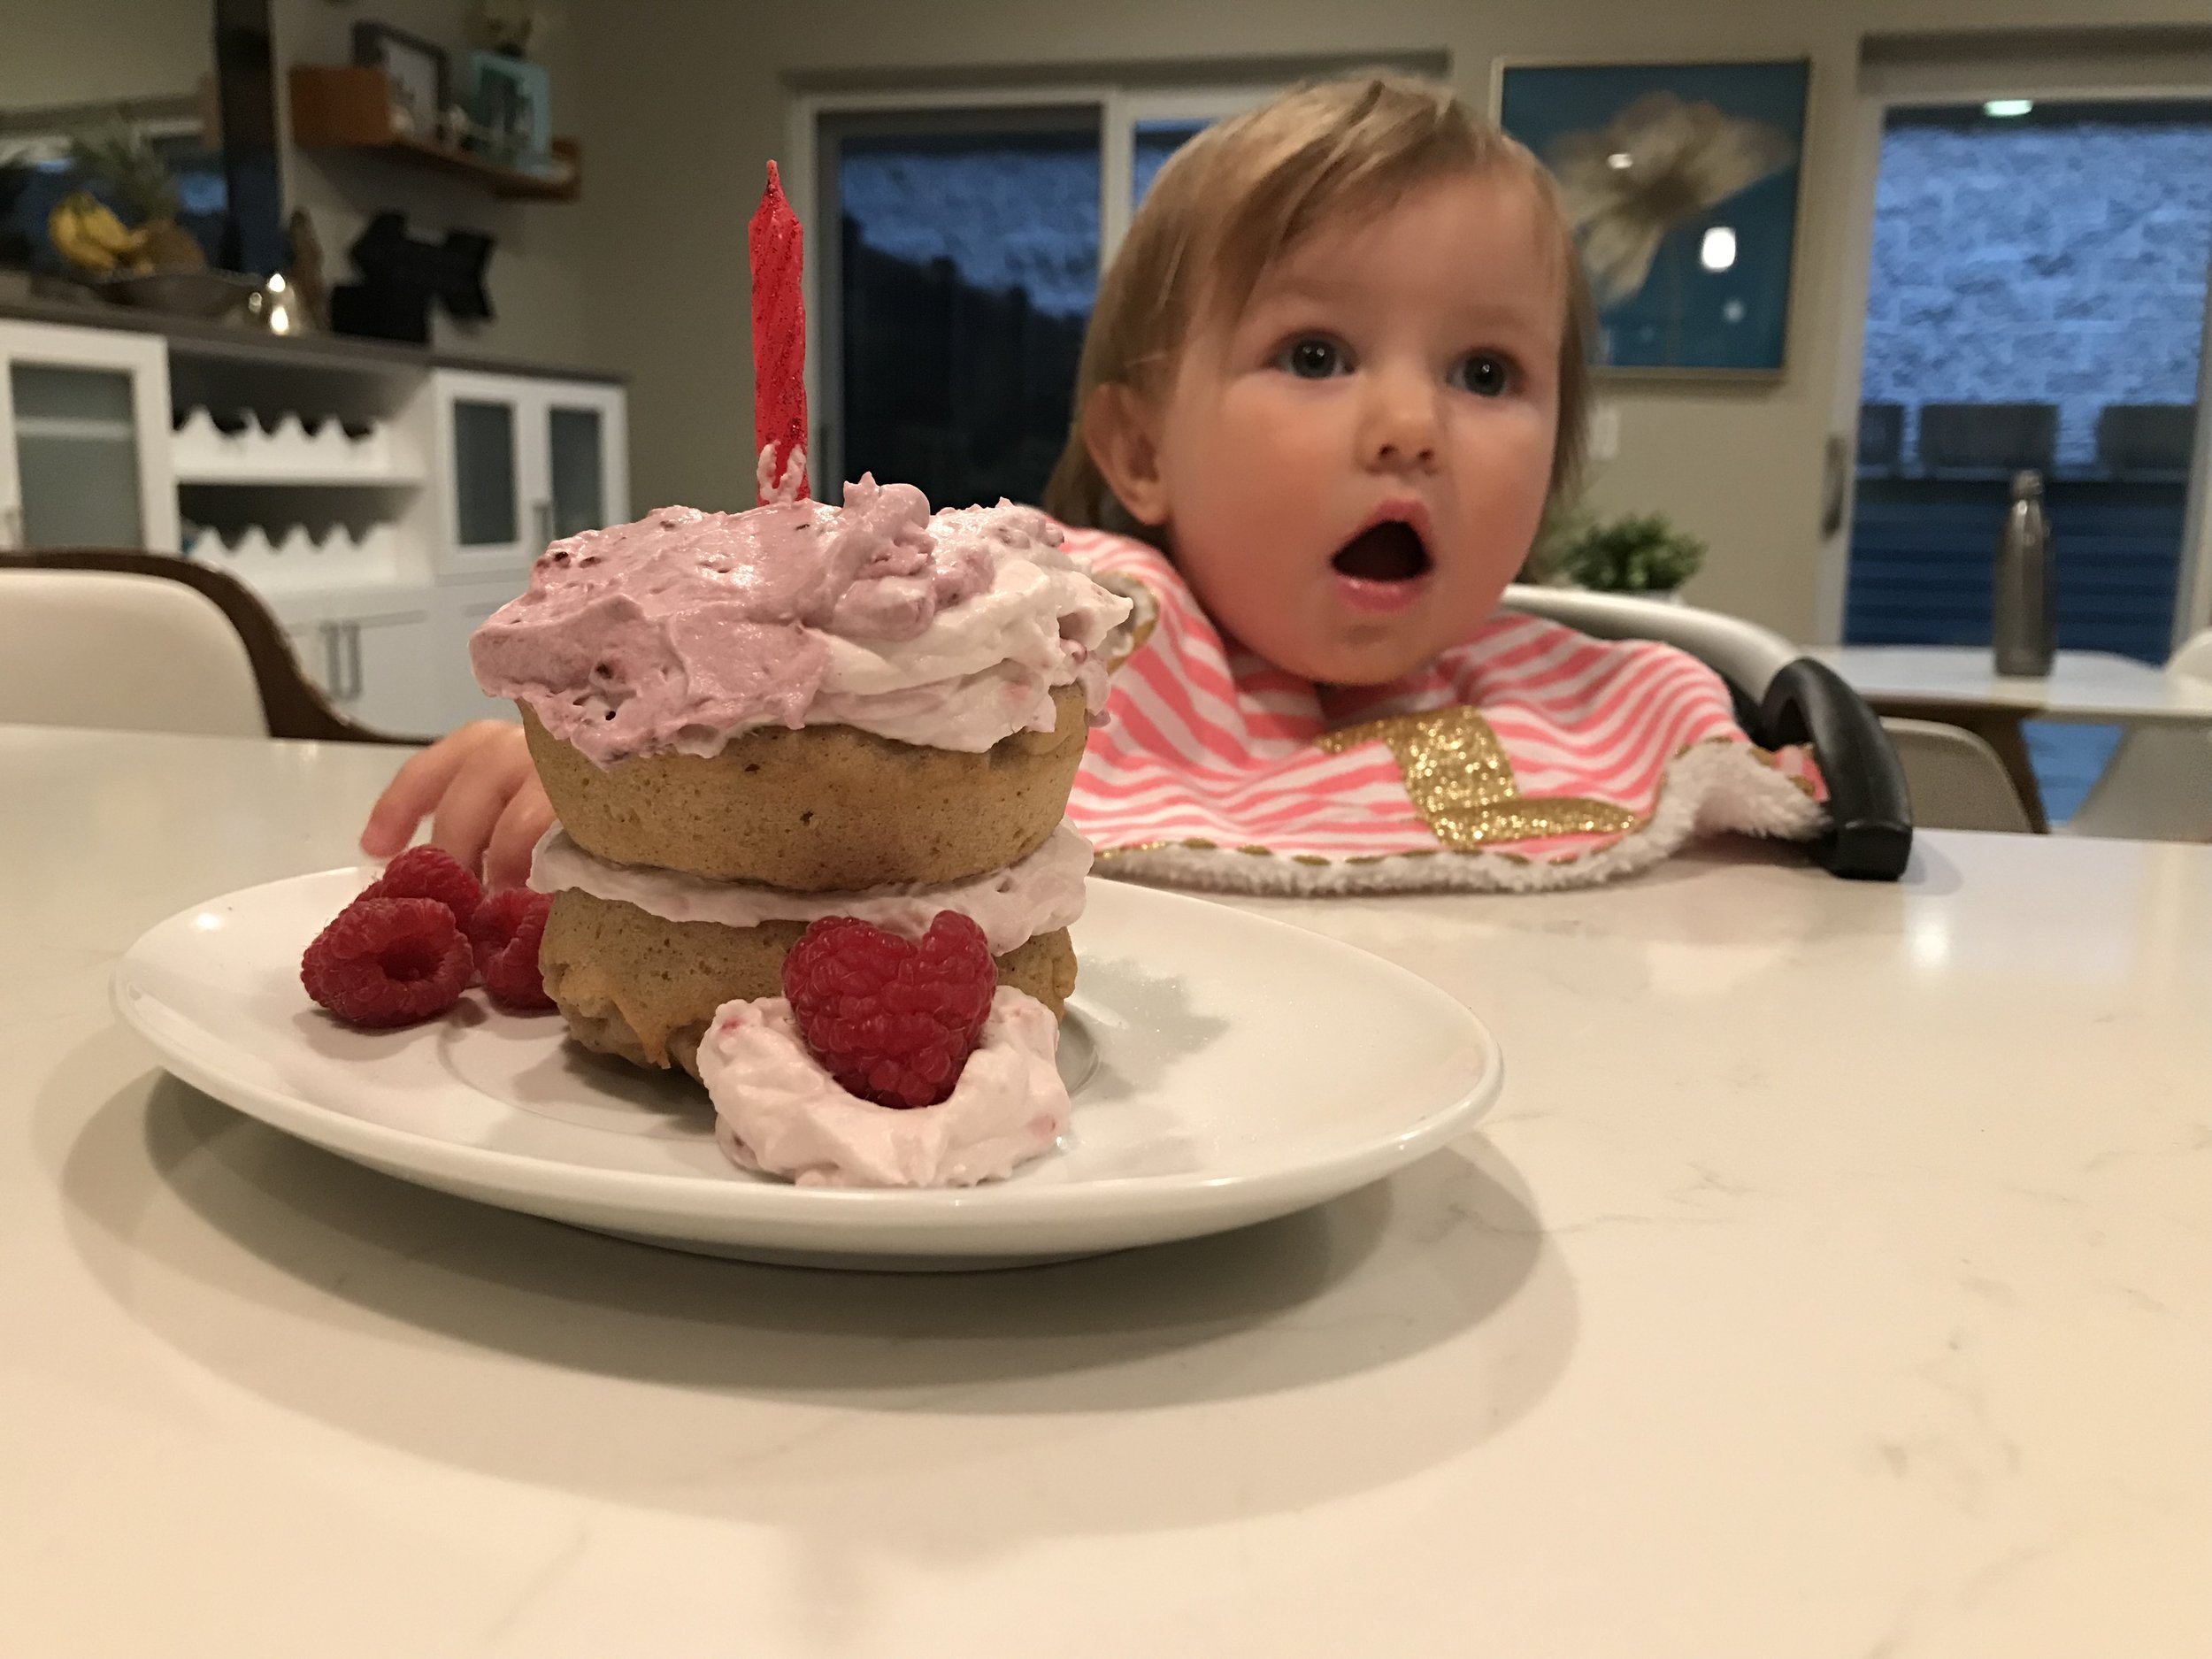
In lieu of a traditional buttercream icing that uses an entire box of confectioner's sugar, I went for a whipped cream topping made pink by adding in 1/8 cup of defrosted-from-frozen raspberries. The berries turned the batter a pretty pale pink. I later tested the recipe with an equal part of defrosted-from-frozen blackberries which turned the cream a beautiful purple hue. You can add in a tablespoon of confectioner's sugar to the cream topping for sweetness (I did), or omit it all together.
Lastly, I baked this in jumbo muffin tins (it made 6), but this amount of batter would fill 2 4 1/2 inch circular cake pans.
Mae loved her smash cake and dipping her chubby little fingers in the frosting. I felt great about giving her something GOOD. The boys loved the cake too and their only complaint was about who would be the one to blow out her candle--ha!

Healthier Smash Cake Ingredients: (for the cake) 1 cup cake flour 1/2 teaspoon aluminum free baking powde 1/2 teaspoon cinnamon 1/4 teaspoon salt 1 medium ripe banana 1/2 cup unsweetened applesauce 1/4 cup whole milk 2 tablespoons pure maple syrup 1 teaspoon pure vanilla extract 1 egg (for the icing) 1 cup heavy whipping cream 1 tablespoon confectioner's sugar (optional) 1/8 cup raspberries or blackberries, defrosted from frozen Directions: For the cake: Preheat oven to 350 degrees F. Spray muffin tins or cake pan with non-stick cooking spray. In a large bowl, whisk together the flour, baking powder, cinnamon, and salt. Set aside. In a blender, add banana, applesauce, milk, and maple syrup and vanilla. Blend until completely smooth. Whisk in the egg. Pour the wet ingredients into the bowl with the dry and stir until just combined; do not over mix. Divide batter evening among prepared pans. Bake for 14 minutes for standard cupcakes, 18 minutes for jumbo muffins, or 22 minutes for a 4 1/2 inch cake pan. Let cakes cool for 5 minute in the pan then transfer to wire racks. Cool completely before adding the icing. For the Frosting: Using an electric mixer, beat the heavy whipping cream and sugar, if using, until soft peaks form. Add in berries, if using, and beat until hard peaks form. Refrigerate until ready to use. Then use a rubber spatula to ice the cake. Store iced cake in the refrigerator to serve.

Is there any better excuse to force-feed your child get your child excited about green food than St. Patrick's day? I swear by baby spinach as my favorite healthy way to turn favorite foods green. It has a neutral flavor that blends seamlessly into whatever you're making: breads, muffins, smoothies, and pancakes! (Take a look at our yummy spinach muffins, here!) It gives these foods a vibrant green color--and not to mention a healthy dose of nutrients--without having to use food dyes. I've been known to blend it into pesto and even into my kids mac and cheese. Here, I added spinach to the blender with the wet ingredients of the pancakes so no evidence remains that there is spinach in these pancakes if you think your kids would be wary. But my kids are used to seeing the little green leaves go right into the blender, so they were happy to press the button and watch the milk turn green. I sweeten these naturally with banana, and you could easily replace that with 1/2 cup of unsweetened applesauce if you have that on hand. I also use white whole wheat flour so the color pops, but you could easily sub all-purpose flour or regular whole wheat flour, though the color might not be as vibrant with the latter.
Whatever you decide, this is the perfect HEALTHY green breakfast for St. Paddy's Day, don't you think?
GREEN PANCAKES makes 8 pancakes Ingredients:
1 1/2 cups packed fresh spinach
1 cup milk
1 large egg
1 medium banana
1 cup white whole wheat flour
1 teaspoon baking powder
1/2 teaspoon baking soda
1/2 teaspoon kosher salt
Directions: In a blender, combine the spinach, milk, banana, and egg and blend until smooth. In a medium bowl, whisk together the remaining ingredients. Pour the wet ingredients into the dry ingredients and whisk until just combined. Heat a large griddle over medium heat and grease with butter. Pour 2 tablespoons of the pancake mixture for each pancake and cook until the top begins to bubble, around 2 minutes. Flip the pancakes and cook for one minute longer and serve.

I've always found that when it comes to Thanksgiving recipes, simplicity wins. Amidst all the heavy appetizers, a massive main meal, and the loads of desserts, this soup stands out as satisfyingly simple in its elements (it contains only 5 ingredients if you don't count the butter) and with all the flavors you crave on Thanksgiving day. It also gets its creaminess from the pureed squash--yep, there's no cream here--which is a welcome relief from the loads of rich and decadent foods.
In fact, I've made this soup almost every year for the past decade as a Thanksgiving appetizer, and it's a win with everyone. With subtle sweetness from the apples, it's a crowd pleaser for kids and adults. I serve it in the slow cooker, set on low, so it stays piping hot. Add pomegranate seeds to garnish, and the colors are vibrant and beautifully Fall in nature.
There are many ways to make a squash soup, and I always use Thanksgiving as an excuse to take shortcuts. You could buy a whole squash and cut it up yourself (more on how to do that here), or you could go for my choice and buy the more convenient (albeit: more expensive) prechopped squash.And like all soups, the longer it simmers, the better the flavors develop, so be sure to make this early Thanksgiving morning or even the day before. I've even made this a week or two before Turkey Day and kept it frozen until the day of, and no one was all the wiser.
If you have a baby, this soup too is a winner! It's the perfect pureed consistency for babies who aren't quite ready for textures, but it also contains delicious flavors and spices to help expand their little palates.
Squash and Apple Soup
Ingredients:
2 tbsp. butter
2 medium onions, diced
3 tsp curry powder
3-pound butternut squash, peeled, seeded and cubed (or around 3-4 cups butternut squash cubes OR 3 cups of butternut squash puree)
2 apples, peeled, cored, cubed
·3 cups chicken stock
salt and pepper to taste
Directions:
In a large pot over medium-low heat, melt the butter. Add onion and saute until tender. Stir in curry powder
Add squash, apples, chicken stock and salt. Bring to boil, reduce heat and simmer for 25 minutes or until squash and apples are tender
Use an immersion blender to puree the soup, or alternatively, transfer to the soup in batches to a blender (careful, it will be hot!). Serve warm with pomegranate seeds as a garnish.

With all the adorable treats there are to buy and make (and eat!) on Halloween, it's refreshing to have something that you can serve that feels slightly redemptive. Especially if you're a parent like me who likes to steal their kids' Halloween candy in the name of safety. As in: "Hmm, that Butterfinger packaging looks iffy. I'm going to have to confiscate that." This pumpkin hummus has all the feels for something that looks super spooky (it's orange, after all!). And you could serve it with black tortilla chips and baby carrots, or even top it with plastic spiders!
Plus, with 5 simple ingredients and 2 minutes to pull it all together, it's totally doable to make despite the chaos of the crazy day. We promise it's worth it!
Pumpkin Hummus
In a food processor, add 1 garlic clove, 1 can drained and rinsed chickpeas, 1 cup canned pumpkin, juice of 1/2 lemon, and 1/8 teaspoon of ground cumin. Puree until completely smooth. Season to taste with salt and pepper.
This year, when my son's class passed around a list of items that parents could contribute to the school Halloween party, I couldn't believe what was on the list: cookies, munchkins, cupcakes (and fine, fruit). But with the amount of candy kids eat on Halloween, isn't it overboard to add even more to their daily sugar quota? We know your kids are going to be all hopped on sugar (mine go totally sugar wild!), but these genius non-sweet, super-spooky ideas are so cute that it just might tempt your kid to put down the candy for a half second.

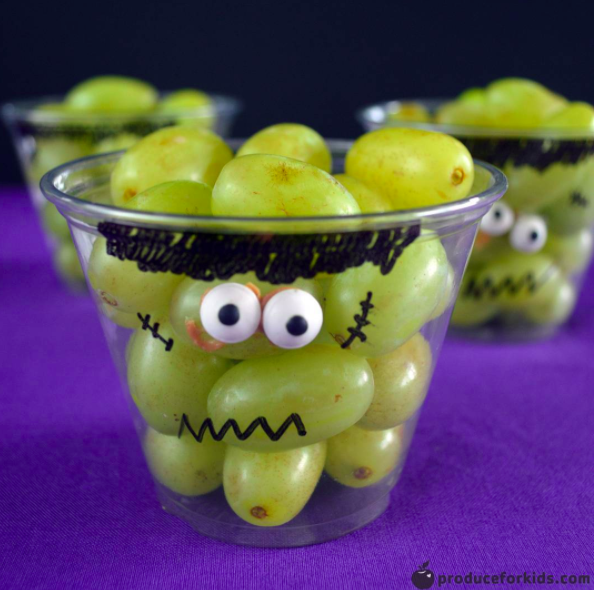
2. MUMMY GRAPES CUPS (from @produceforkids). Use a black sharpie and clear plastic cups to create an adorable snack.
3. PIZZA MUMMIES (from @heather_kidskitchen). For when you're begging your children to eat dinner. String cheese and olives for eyes transform the plain old pizza bagel into something that screams Halloween.
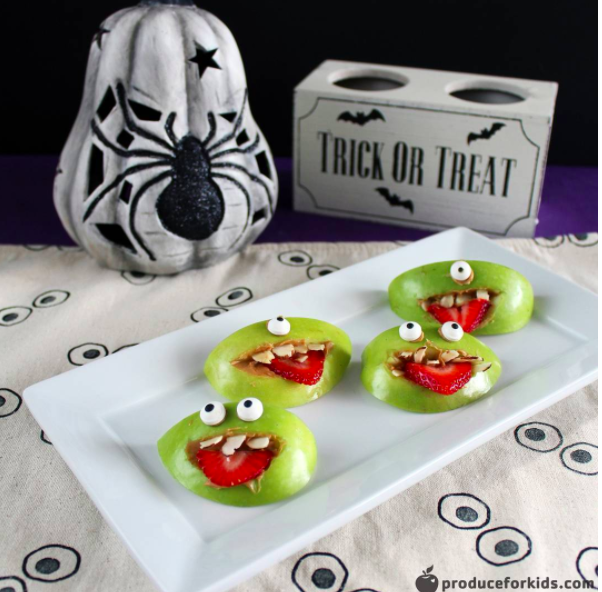
4. APPLE MOUTHS (from @produceforkids). Use almonds for teeth, strawberries for a silly tongue, and peanut butter or sunbutter to hold 'em in place.
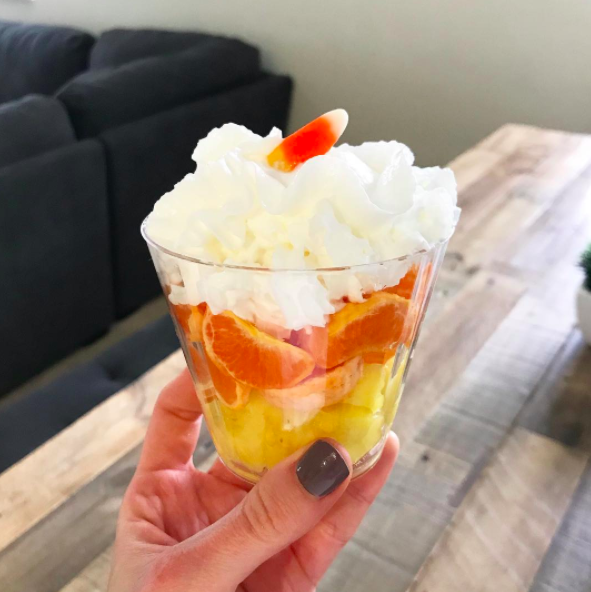
5. CANDY CORN CUPS (from @morepleasemama). A mixture between a treat and healthy fruit, this is one the kids will definitely eat (at least the top layer!)
6. CLEMENTINE JACK-O-LANTERNS (from @fountainavenuekitchen). All you need is a black sharpie and an ability to draw triangles.

7. MUMMY HOTDOGS (from @allrecipes) Stretch out strips of puff pastry dough and go to town!

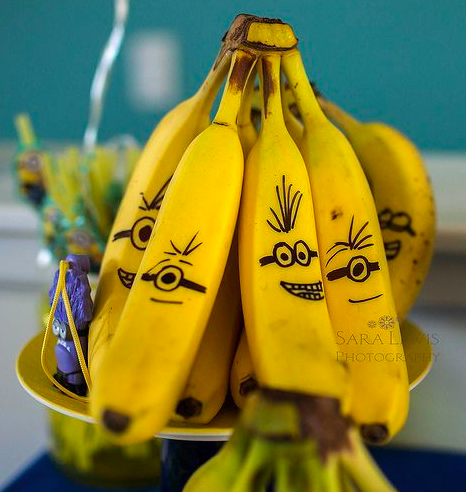
8. Minion Bananas (from @saralewisphotography ) There are ways to make these super silly by glueing on eyeballs and wrapping the bottoms in blue tissue paper. Or you could just do this and the kids will love them anyway.

In an confusing twist of events that's beyond all adult understanding, my 5-year-old decided he likes oatmeal. This ill-timed conclusion occurred once the weather settled in at a steady 80 degrees, and around the same day I decided to forgo all hot breakfasts--especially ones (ahem, oatmeal), I'd been trying to get him to eat all winter long. Oh the irony! But when a picky 5-year-old decides he likes something, you make it. Enter these overnight oats. They're so refreshing, can be prepared in advance, and are endless in their flavor possibilities. All it takes is a little advanced planning--overnight oats can be made 1-3 nights before you're ready to eat them so I usually make a bunch of individual servings in mason jars or tupperware (any lidded container will do), and we eat them throughout the week. You can substitute regular milk for coconut milk, almond milk, or whatever, and topping possibilities can include granola, nuts, seeds, shredded coconut, or fruit. And that bit of advanced planning makes mornings so much easier. Just stick in a spoon and breakfast is done.
Here are my three go-to versions. All recipes are for individual servings, but you could also quadruple the recipe make a big bowl, cover it with plastic, then scoop out as much as you'd like. I also love serving these for breakfast when staying with a big group. So much easier than frying up eggs or pancakes in the morning!
MANGO COCONUT OVERNIGHT OATS (pictured) Combine 1/2 cup rolled oats, 1/2 cup coconut milk, 1/2 cup plain yogurt, and 1 tsp honey. Stir together. Top with 1 tablespoon unsweetened flaked coconut and 1/2 cup mango chunks (I use frozen). Cover and refrigerate overnight or for up to 3 days.
MIXED BERRY OVERNIGHT OATS Combine 1/2 cup rolled oats, 1/2 cup almond milk, 1/2 cup plain yogurt, a pinch of cinnamon, and 1 tsp honey or maple syrup. Stir together. Top with 1 tablespoon each ground flaxseed, sliced almonds (optional) and 1/2 cup mixed berries. Cover and refrigerate overnight or for up to 3 days.
CHOCOLATE BANANA OVERNIGHT OATS Note: Since bananas will brown, we stir this all together and add cocoa powder to disguise the color change). Mash 1/2 of a banana, then stir in 1/2 cup rolled oats, 1/2 cup milk, 1/2 cup plain yogurt, 2 teaspoons cocoa powder and 1 tsp honey. Cover and refrigerate overnight or for up to 3 days.

On our table at the holidays, my family rarely remains married to any one particular dish. We don't live by rules that say we have to eat THIS on Christmas, and THIS on Mother's Day, and so on. In fact, most of our holiday meals are new recipes that just sound really good but that we would never have time or energy to make on a normal Tuesday; a porchetta that takes 2 days to marinate in the fridge or a baked french toast with homemade berry sauce would never fit into my weekday routine. This recipe, however, is the exception in being both traditional and unfancy. Macaroni Pie--which isn't a pie at all, but more a combination of spaghetti, eggs, and an ungodly amount of cheese--has appeared on our Italian family's Easter table for generations. My grandmother learned the recipe from her mother, who learned it from her mother, and so on. And with a short list of humble ingredients and a prep time that's as long as it takes for water to boil, it's proof that simplicity often wins.
We only see this recipe once a year, and I never understand why. It's a comfort food that everyone can agree on. Adults love that it tastes like a baked version of cacio e pepe. And try arguing with your kid to taste a food that contains both Macaroni and Pie in its name. Additionally, the recipe can be made even more convenient by baking single servings in muffin tins, rather than in one baking dish as I do in the recipe below.
Either way, I hope you enjoy it!
Macaroni Pie
Serves 16
Ingredients:
1 pound spaghetti
1 dozen eggs
2 cups shredded parmesan (get the good stuff) OR pecorino romano cheese
1 tablespoon ground black pepper (Yes, that's 1 full tablespoon, but you can reduce to 2 teaspoons if you prefer)
Directions.
Preheat oven to 400 degrees. Generously butter a 9x11 inch cake dish. Set aside.
In a large pot, bring salted water to a boil and add spaghetti. Cook pasta 2 minutes less than its suggested cooking time (pasta will continue to cook in the oven).
While you're waiting for the water to boil: In a large bowl, whisk together eggs, cheese, and pepper. Add drained pasta to the bowl and mix together until combined (two forks or tongs usually does the trick). Pour into pan and spread evenly.
Cover with foil, and bake for 35 minutes. Remove foil than bake for 10 minutes more until the top gets nice and crunchy. Let cool for 15 minutes and then cut into 16 slices.
Notes:
*This can be made up to three days in advance. Reheat, covered, in a 350 degree oven for 10-15 minutes.
*If you're making this in muffin tins, we recommend parchment liners to prevent stickage. Also, to make filling easier, add the cooked spaghetti directly to the muffin cups and then use a measuring cup to pour the mixture over the pasta. Reduce cooking time to 20-25 degrees covered and then an additional 5-10 minutes uncovered.

With the last-minute holiday to-do list being checked off twice, it's easy to forget about what you're going to eat on Christmas morning. But having a satisfying and festive breakfast is the best way to relax, savor the moment, and power you and the kids through the rest of the day. Especially when your kids are likely to wake up before the sun. We love these gingerbread pancakes for many reasons:
-they're low on sugar and made with whole wheat flour to give you longer-sustaining energy.
-the batter can be prepared the night before (just cover with plastic wrap, making sure the plastic wrap is pressed directly onto the batter).
- cooking them will fill your home with holiday smells that bring everyone to the table.
- since pancakes require hands-on cooking time, you can use your other hand to down a much needed cup of coffee.
These pancakes can get dusted with a sprinkle of powdered sugar (place a cookie cutter shape on top to make them extra festive), or served with real maple syrup. Our only plea is to avoid imitation syrups that are loaded with high fructose corn syrup. The real stuff isn't refined so it won't cause as dramatic a blood sugar spike and crash--and the real stuff is so sweet that you can actually use way less--a tablespoon is plenty! Serve with fruit and eggs or breakfast sausage to add in fiber and protein and round out the meal. And coffee. Lots of coffee.
Another bonus: The dry mix (from whole wheat flour through brown sugar) makes a great holiday food gift if you're short on time and don't feel like baking. Procrastinators, rejoice!
GINGERBREAD PANCAKES
(makes 10 pancakes)
Ingredients:
1 cup whole wheat flour
1 tablespoon baking powder
1 teaspoon ground ginger
¾ teaspoon ground cinnamon
¼ teaspoon ground nutmeg
¼ teaspoon salt
2 tablespoons brown sugar
1 cup milk
1 egg
2 tablespoons butter, melted and cooled slightely
2 tablespoons molasses
Directions:
In a large bowl, whisk together the dry ingredients: flour, baking powder, ginger, cinnamon, nutmeg, salt, and brown sugar.
In a small bowl, combine the we ingredients: milk, egg, molasses, and butter.
Pour wet mixture into the flour mixture and stir just until the mixture is fully combined. Do not over mix.
Heat a non stick pan over medium-low heat. Grease pan with butter or non stick cooking spray. Using a 1/4 cup measure, pour batter onto griddle and cook without touching for 2 minutes or until the top of the pancake starts to bubble. Flip, and cook for 1-2 minutes more until both sides are golden brown. Repeat until all pancakes are cooked.

Why, I ask you, is stuffing limited only to Thanksgiving? This post is my plea to make Thanksgiving's best side dish extend throughout the winter. It's the ultimate comfort food--and this version redeems itself by containing also veggies and a fruit (and, ahem, sausage and butter). I love these bite sized versions for many reasons:
Mini Sausage and Apple Stuffing Bites
Makes 24 Muffin Size Bites
Ingredients: 1 baguette cut into 1-inch cubes, about 8 cups 1 tablespoon butter 2 tablespoons olive oil 2 sausage links, castings removed (or 1 cup ground sausage) 2 apples, chopped 1 small yellow onion, diced, about 1 cup 4 celery stalks, diced, about 3/4 cup 2 teaspoon minced fresh thyme 2 cups organic low sodium chicken stock 3 large eggs, beaten ½ cup dried cranberries, optional
Directions: Preheat oven to 350 degrees. Grease 2 muffin tins or line with parchment liners. Set aside Place bread cubes onto cookie sheet, and cook in the oven for 8-10 minutes until toasted. In a large skillet over medium heat, sauté sausage in butter and oil until cooked through, about 5-7 minutes. Add apples, onions, celery, and thyme and sauté for 8-10 minutes more, until onion is translucent and celery is soft. Remove from heat. In a large mixing bowl, stir together sautéed ingredients, bread cubes, chicken stock, eggs, and cranberries and toss to thoroughly combine. Spoon the stuffing mixture into greased muffin tins, filling all the way to the top. Pat the mixture down to pack it well. Bake for 25 minutes until bites are golden. Serve warm or at room temperature.
Peasful Kitchen was started as a social place for like minded parents to connect, learn, and enjoy making food for their families. We have since grown from a baby food company to a complete website that covers every stage of a families growth — from freezer meals for expectant moms, to baby and toddler food, to family dinners that bring smiles ( and sanity!) to your table.
Whether you’re a new mom who wants to serve your baby real food from the start, or you’re a veteran parent who wants to put more nutritious meals on the table, we can help you make dinnertime more do-able. Join us, and experience the confidence and pride that comes with taking the step to make your family healthier and happier.
CATEGORIES
We are constantly working to raise the bar on our services. If you have any questions or concerns about your experience, please let us know.
Nicole
nicole@peasfulkitchen.com