
Protein-Packed Overnight Oats
/
This family-friendly make-ahead breakfast gives you all the protein you need to fuel you until lunchtime!
Read More
This family-friendly make-ahead breakfast gives you all the protein you need to fuel you until lunchtime!
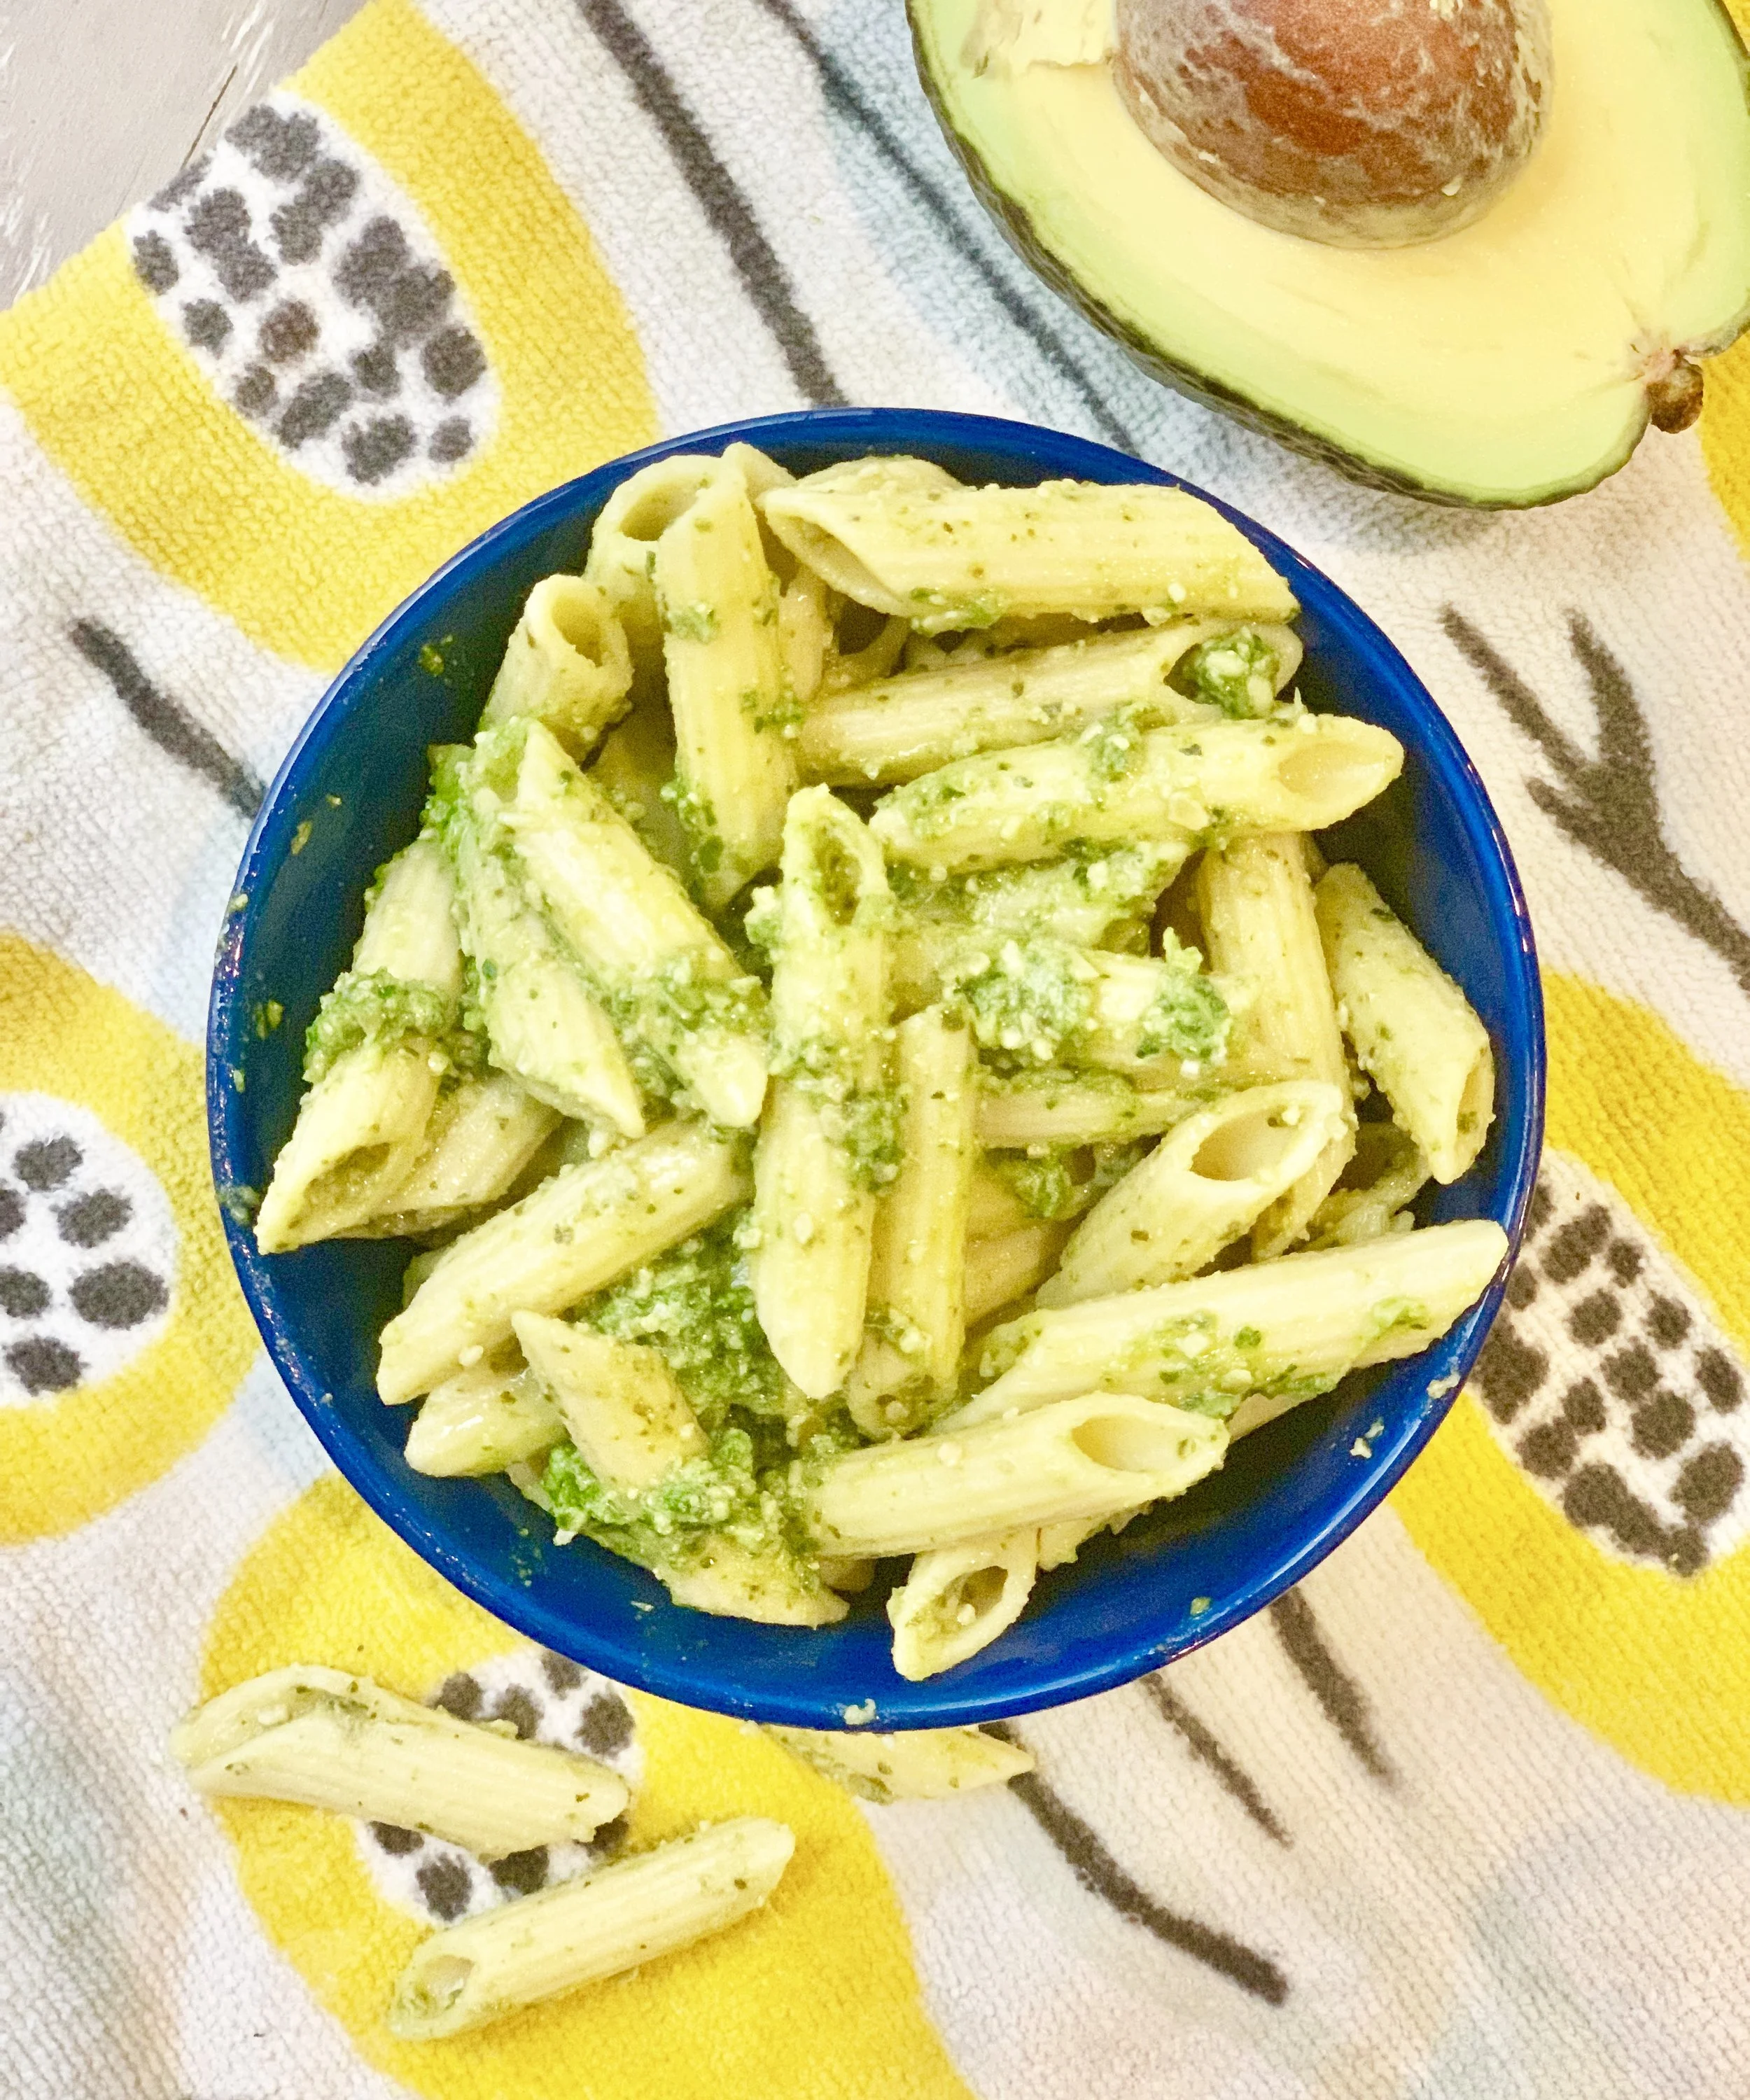
Read MoreIt’s pesto that packs a nutrient-dense punch! This kale-avocado version will spruce up your weeknight meals.
Read MoreKids love to dip! This flavorful white bean dip is packed with satiating protein and fiber and perfect for dipping pita and veggies!
Read MoreThis pretty pink berry smoothie tastes like a milkshake but is loaded with lots of fruit and even a veggie (can you guess which type?)
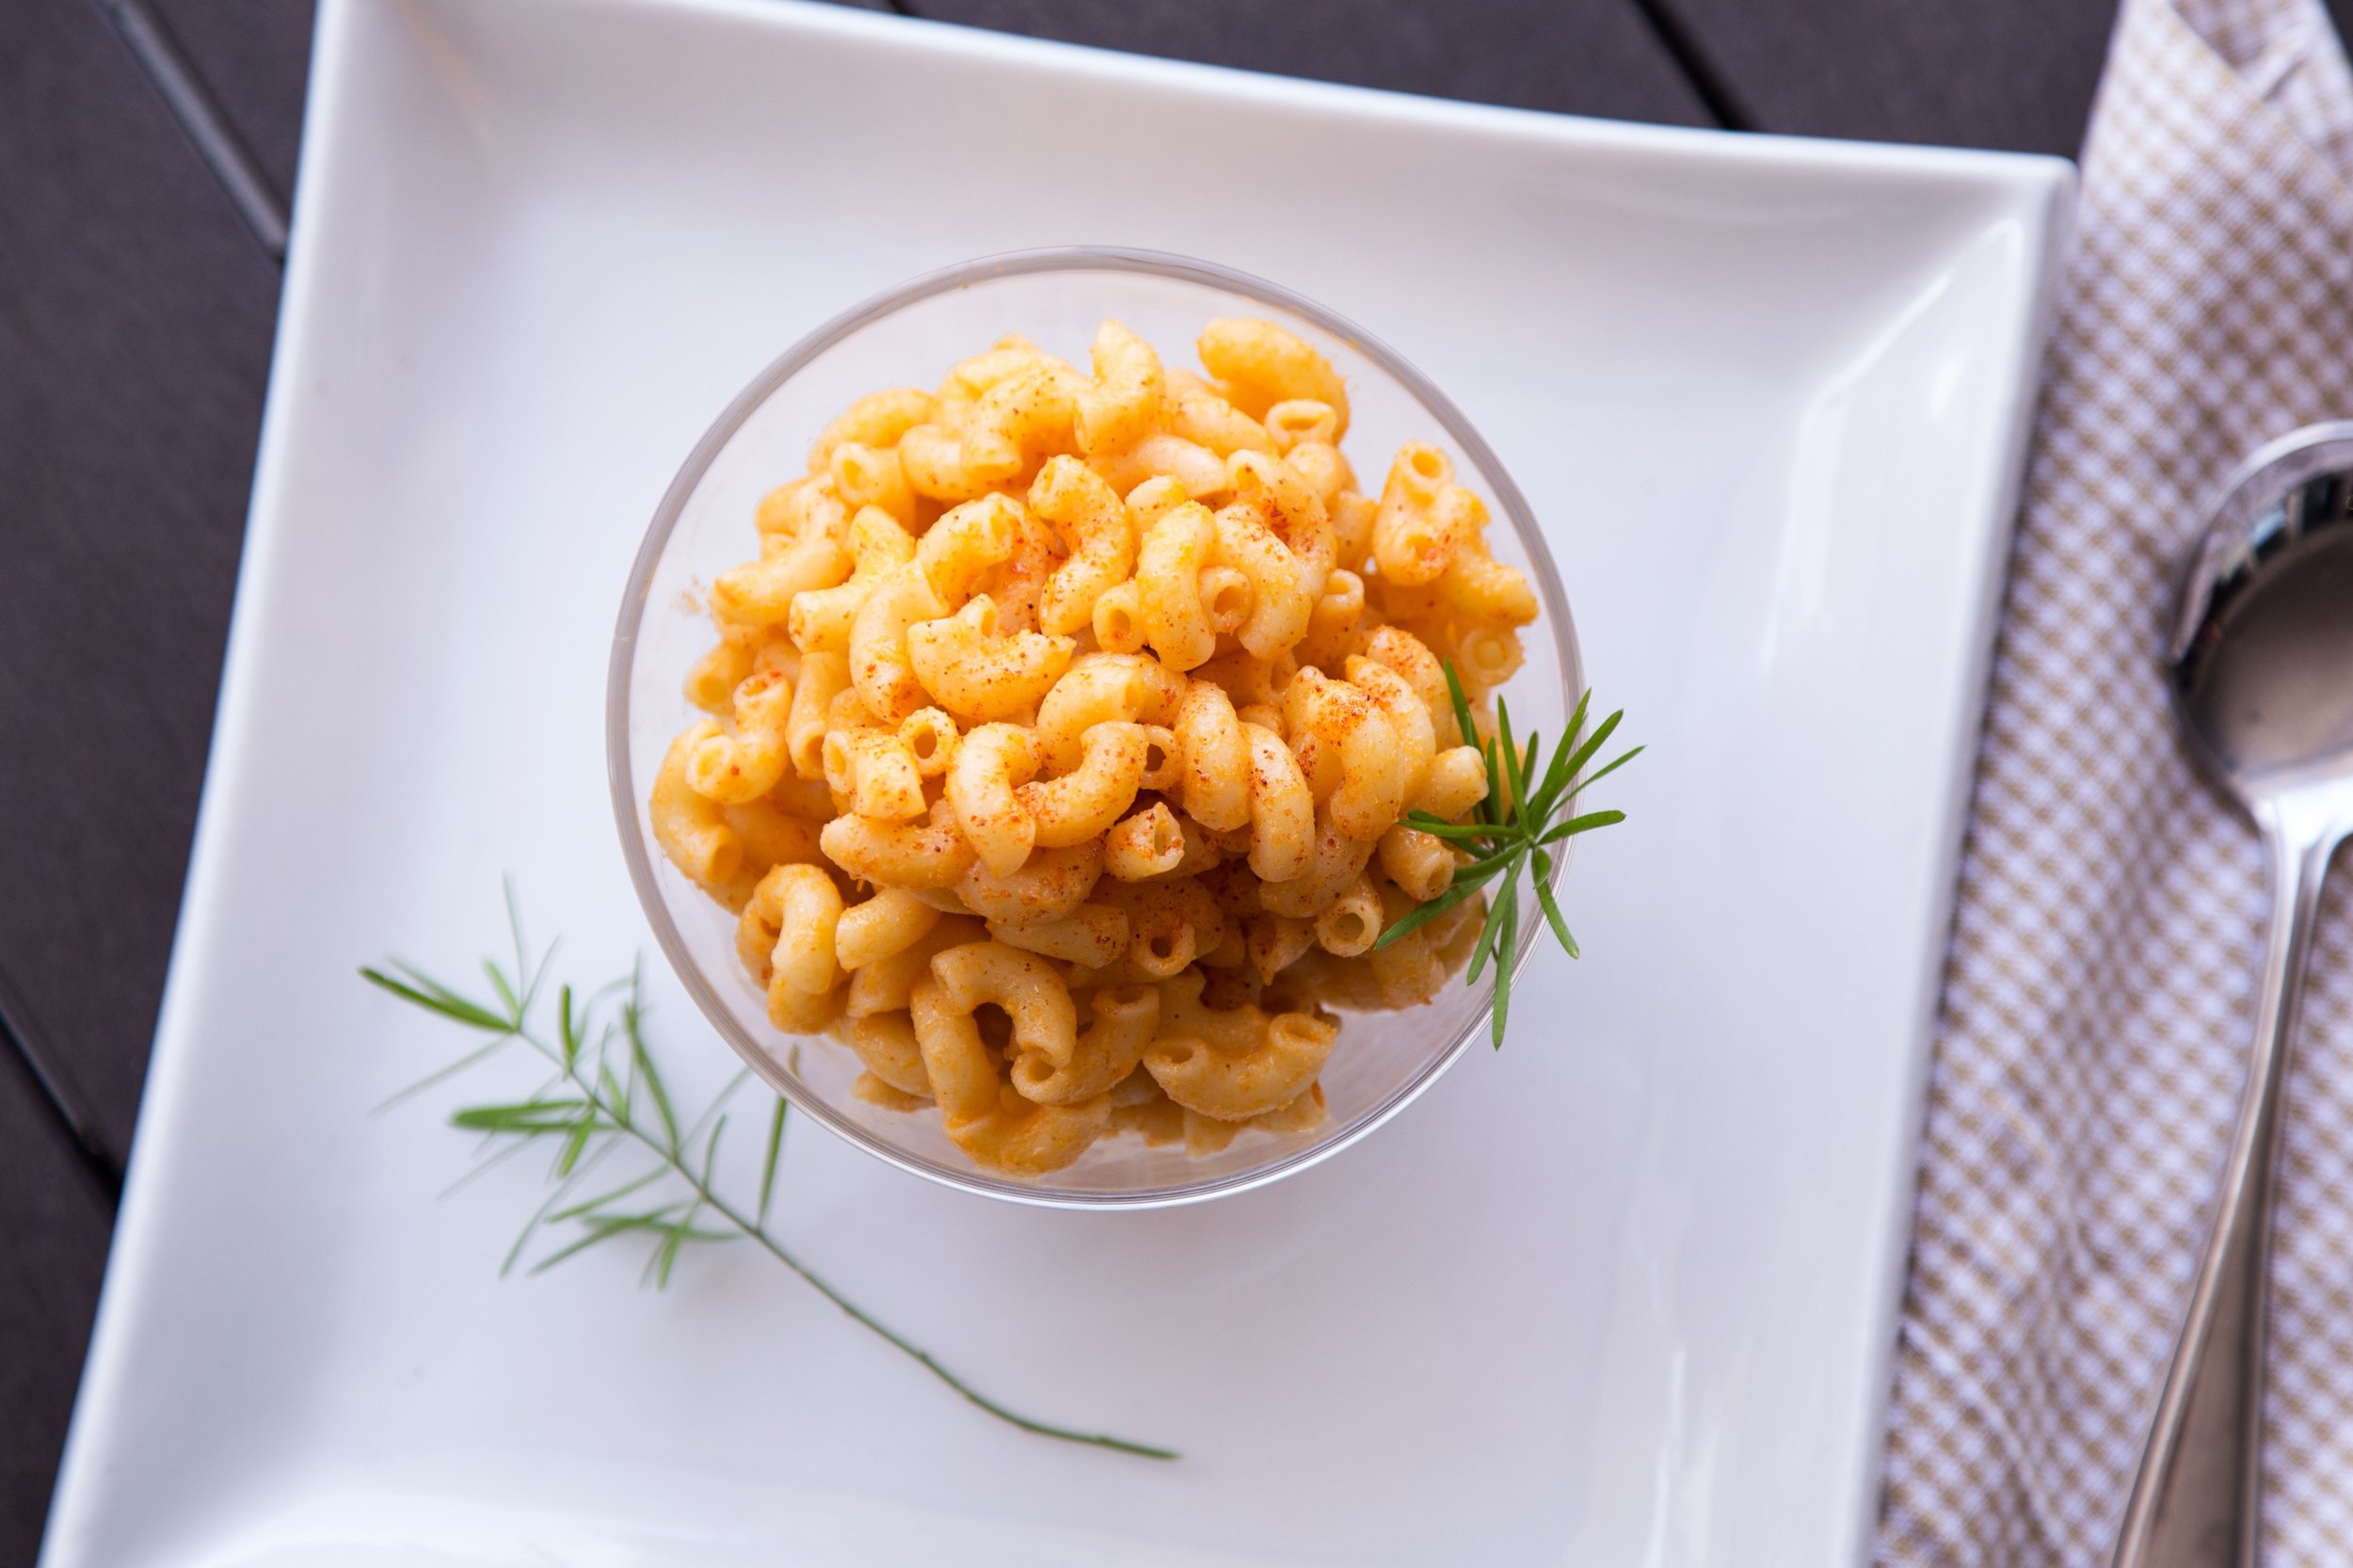
Read MoreThis toddler-friendly mac and cheese is loaded with three types of cheese and squash (you didn’t think I’d leave out a veggie, did you?) which is virtually tasteless and mimics that neon orange color that kids love from the boxed stuff.
Read MoreMy favorite muffin recipe combines carrots, apples, raisins, coconut and more for a delicious morning—or anytime!—treat.
Read MoreA bowl that’s packed with 8 different veggies and enough protein for a healthy winter meal.
Read MoreYour family will become a casserole convert with this version that’s soup free, and made of real wholesome ingredients! It’s comfort food at its best.
Read MorePacked with chocolate flavor kids love plus filling protein and a heap of leafy greens!
Read MoreOverhead Cheesy Chili Corn Chowder with corn chips and bowls and spoons

Welcome to week 4 of our What’s Up World series—each week my children and I read about a different county and cook a meal from that location. Our travels this week took us down to South Africa, a country that’s on my personal bucket list to visit one day (and for now, this will have to do!). We read about the idea that South Africa is sometimes called the rainbow country because people from so many different countries have settled there. You could say the same about the city where my family lives, too—we’re a part of a community where there is a lot of diversity of race, nationality, and religion—and I appreciated the opportunity to reinforce what I always tell my children at home: that God made everyone different and everyone special. In the book, the narrator's meal choices also hit home—he ate cereal for breakfast and macaroni and cheese for lunch. And then we got to the narrator’s dinner and the kids almost fell out of their seats. On his family table was tripe, a disguised word for sheep stomach. My kids begged me that the meal we choose to make NOT be tripe, and I agreed that it was something that none of us could stomach (<—see what I did there?).
So instead I consulted with my friend Sharon from www.cookingwithkidsNY.com who teaches international cooking classes and whose trips have taken her around the globe. She suggested that we make Githeri, an African stew made of beans, vegetables and spices. It sounded perfect!
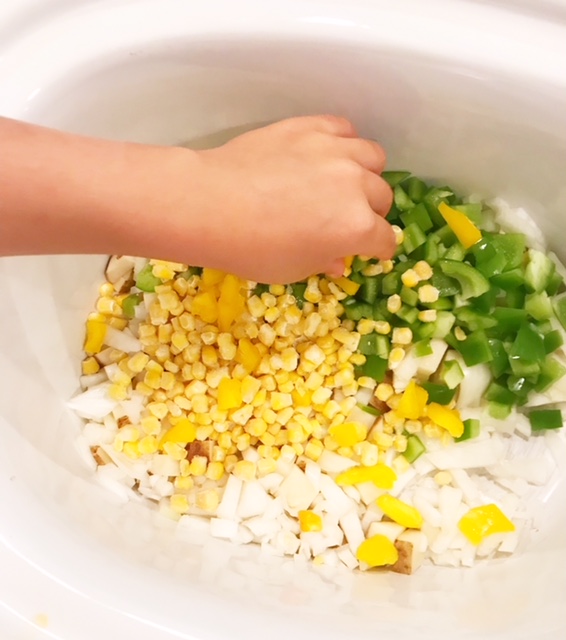
Admittedly, this recipe required a lot of chopping, but my kids didn't mind one bit. The boys are thrilled any time they get to use their knives (we use these kid-friendly ones from Curious Chef), and they went to work chopping up peppers and scallions while I handled the the heartier potatoes and carrots.

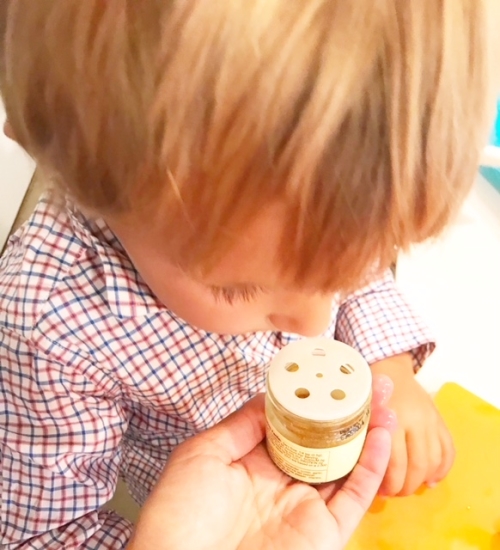
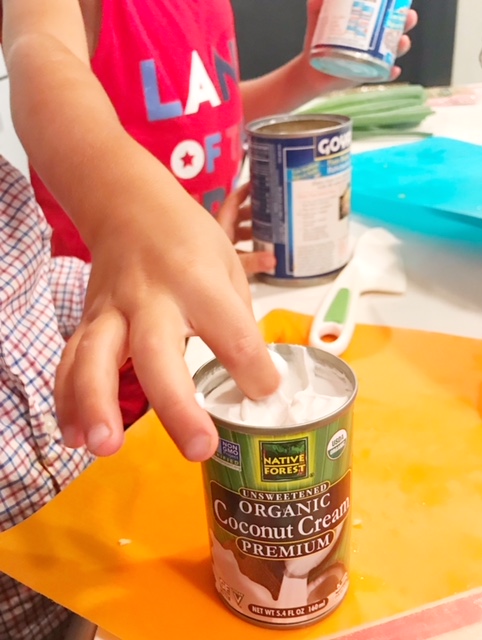
Once the veggies were all in the pot, we took turns smelling spices: curry, ginger, and coconut cream. I love watching their reaction. My 3 year old loved the smell of the curry while my 6 year old wrinkled up his nose at the same smell. They both agreed that coconut cream was something we should have every day, and it was hard to get them to stop sneaking tastes.
Lastly, we dumped everything in a slow cooker and let it do its thing. On busy summer days it’s such a treat to come home to a done dinner and spend an extra half hour at the park rather than forcing everyone to retreat early so I can cook.
For fun, I served this over alphabet-shaped pasta, but rice, quinoa or pita bread would make a nice substitution.
Getting kids to eat new flavors can be challenging, but getting them involved in the cooking process almost always guarantees that they'll try it. If I were to serve this blindly, I can bet that it would have been a struggle for them to take a bite. But this time, they ate it happily and proudly showed my husband what they had made.
I too enjoyed the flavors and I plan to experiment with other vegetables depending on what's in season. This meal would freeze easily, so you could even make it in bulk and then freeze a portion for the future.
But for now, we're closing out our chapter in South Africa, and flying back to Asia. China, we're coming for you!
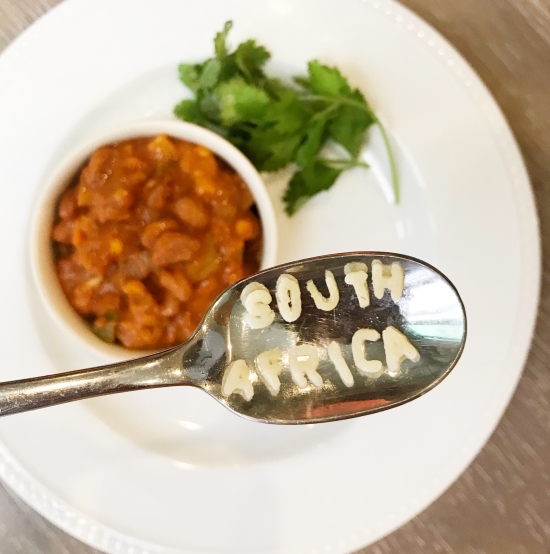
GITHERI (vegetable and bean stew) makes 6 servings
Ingredients: 2 ears of corn, cut off the cob (or 2 cups of frozen corn kernals 2 cans of pinto or kidney beans* 1 28-ounce can crushed tomatoes 1 onion, diced 3 cloves garlic, minced 2" ginger, peeled and grated 3 scallions, sliced 1 potato, chopped 2 carrots, chopped 1 green pepper, chopped 1 tbsp curry powder 1 1/2 cups of coconut cream 1/2 tsp salt 1/4 tsp pepper handful of cilantro, chopped (additional ingredients only needed if cooking on a stovetop) 1 tbsp butter 1 tbsp olive oil 1 1/2 cups vegetable or chicken broth
Directions: (for the slow cooker) Add all ingredients to a slow cooker through cilantro and mix well. Set on low and cook for 8 hours. Season to taste with salt and pepper. Garnish with cilantro.
(for the stovetop) Heat a large dutch oven on medium heat and add the vegetable oil and butter. Add onions and cook until translucent. Add the ginger and garlic and cook for 1 minute more. Add curry powder and cook another 1-2 minutes. Add tomato puree to the pot. Reduce the heat to a low simmer for 5 minutes or until the mixture thickens a bit. Add the potato, pepper, carrots, scallion, corn, beans, vegetable stock, coconut cream, salt and pepper. Cook, stirring occasionally for 20-30 minutes until vegetables are soft. Add cilantro and cook several minutes for the flavors to mix. Season to taste with salt and pepper.
*Traditional canned beans contain a high amount of sodium. Rinse before using or look for low sodium or organic beans instead.

We're continuing our virtual trip to the beautiful county of India (if you're new here, you can learn more about our adventure HERE to join us--it's never to late!). This country, I told the boys, was ALL THE WAY around the world, and they used that information to spend the next three minutes fighting over who could spin the globe to the other side because nothing brings out that special side of siblings like summer vacation. Once both had the opportunity to spin that very object that's on display every day but otherwise gets ignored lest the other shows interest, we moved on to reading all about this special country.
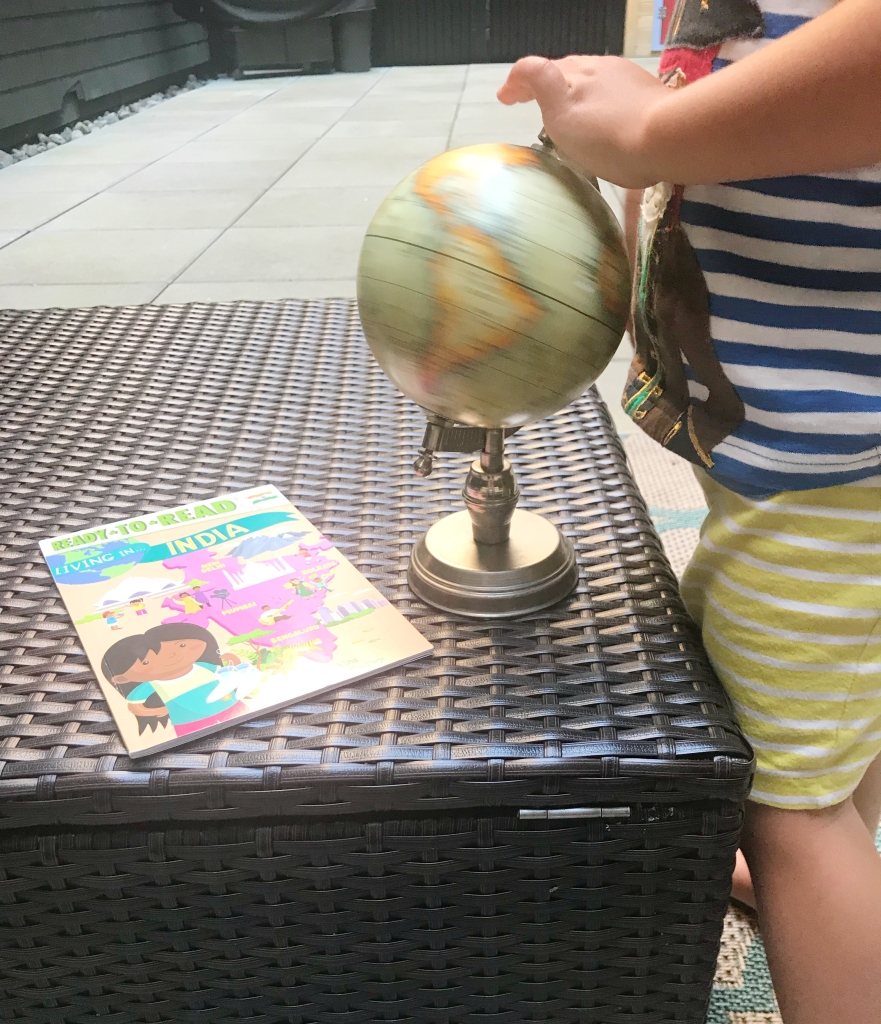
Like the book we read about Brazil, the story about India was narrated by a school-aged girl, and this one had 56 kids in her class. I was surprised to learn that schools are so full in India, that students are divided into two groups--those who attend school in the morning and others who go in the afternoon--to keep up with the demand. We finished the book and I couldn't wait to move on to trying the recipe.
I wouldn't dream about writing about Indian cuisine without consulting my friend Kanchan who grew up there but now lives in Brooklyn. Her cookbook and blog, Spice Spice Baby, include recipes that span from babyhood to adulthood and will inspire you to experiment with all different kind of spices. She also has a Ph.D. in Biomedicine from Harvard (#girlpower for real!) and I love how she incorporates the information about healing power of various spices into her cuisine.
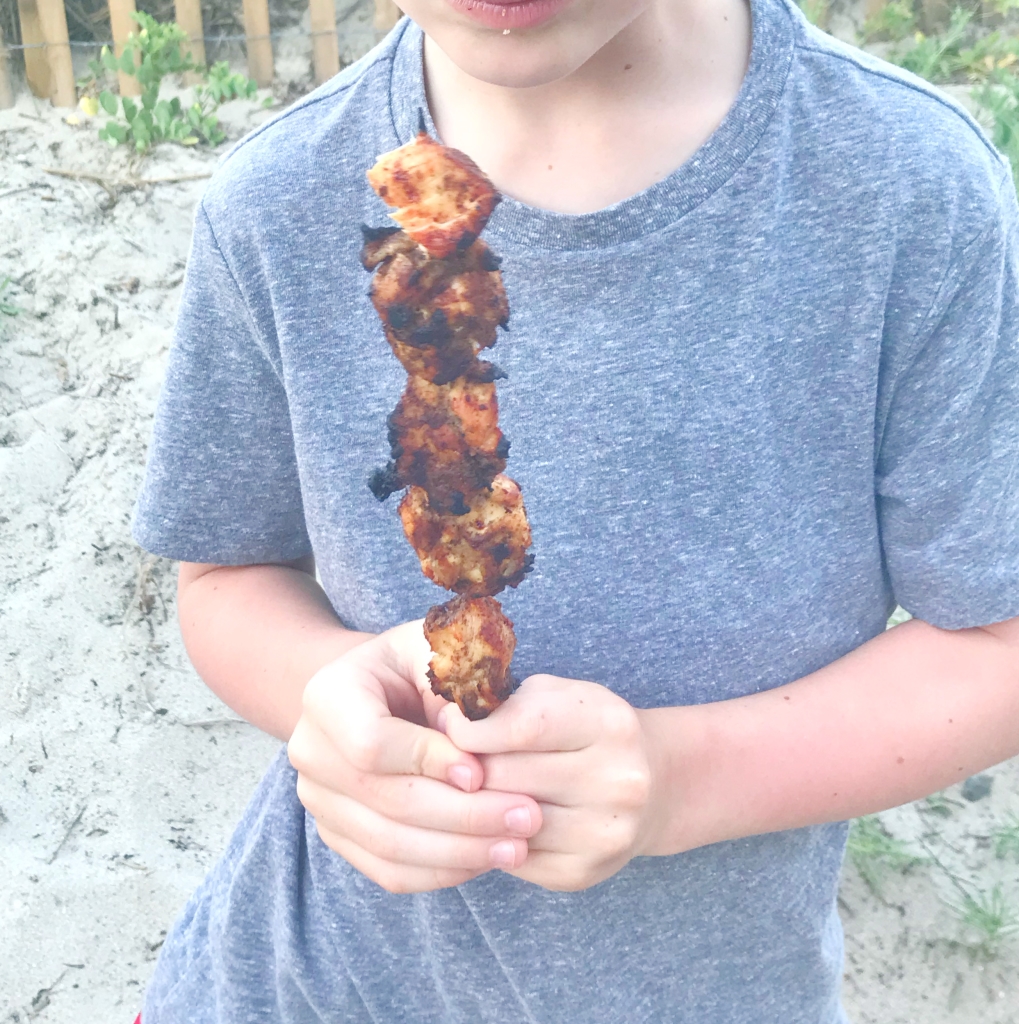
We decided to make these super flavorful chicken kebabs from her cookbook that happened to be her childhood favorite food. On her son's first trip to India, her mother cooked these same kebabs for him, and he devoured them just as she had done as a kid! I personally like using familiar foods as a vehicle for introducing new flavors, so I was excited to make these with my kids. Plus, anything on a stick is always fun to eat and inevitably turns into a kebab sword fight. Ah, boys.
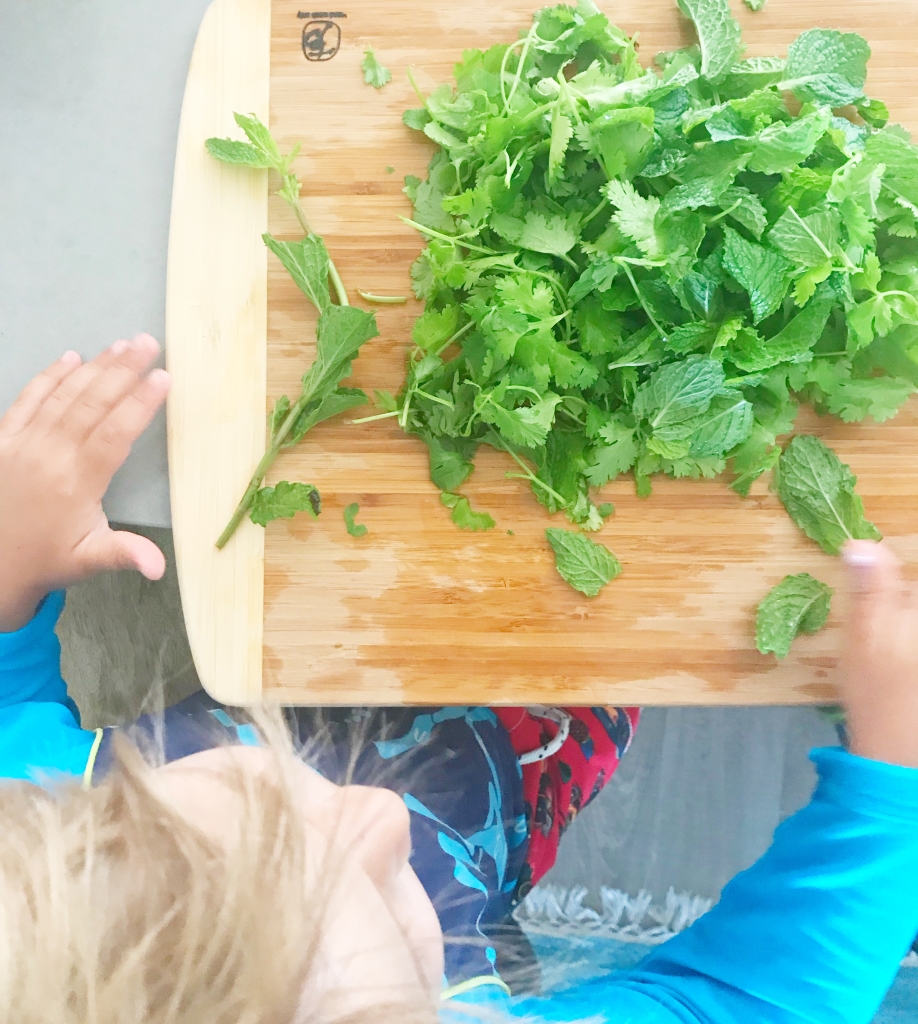
I chopped up the onion, garlic and ginger while the kids picked off leaves off cilantro and mint. I set out a cutting board and asked them to put the stems in one pile and the leaves in the other, and they went right to it. We also took turns smelling the ginger, garam masala, garlic, and herbs. Once we blended up the herb mixture in the food processor, I sealed off that and the chicken in a large zip lock bag, and the kids got to squish it around to evenly distribute. I left the kebab skewering to yours truly because there wouldn't be enough bandaids in the house to cover the potential boo-boo damage otherwise.
My whole family ate these right up, including my 1 year old whose chicken I chopped into tiny bite size pieces. These make a great flavorful food for baby-led weaning. Introducing infants to a variety of herbs and spices can make them better eaters--in fact studies show that the more flavors a baby is exposed to before age 1 translates to the more variety of foods they eat at age 7.
We're having so much fun with this series, and can't wait to land in our next stop: Italy!
Chicken Kebabs with Garam Masala, Mint and Cilantro
makes 12 kebabs
Ingredients:
½ small red onion, roughly chopped
4 garlic cloves, minced
A fistful of fresh cilantro (leaves and soft stems)
4-6 mint leaves
1 teaspoon peeled and grated ginger
1 teaspoon garam masala (make your own as in Page X or store-bought)
1 teaspoon salt
1 pound boneless, skinless chicken breasts or tenderloins, chopped into 1 inch pieces
Coconut oil
Lemon juice
Directions:
In a food processor, blend together the first 7 ingredients until onion, and herbs are minced and mixed well. Transfer meat and herb mixture to a a gallon sized ziplock bag and mix well.
Mold the meat mixture into 2-inch long kebabs and set aside.
Heat a grill pan or skillet to medium and brush lightly with coconut oil. Cook the kebabs, turning them every minute or so for 10-12 minutes to ensure even cooking all around. Brush the kebabs with coconut oil while cooking, every few minutes, to prevent them from drying out. If cooking in batches, avoid over-crowding and brush the skillet with more oil as needed between batches. Check one kebab for doneness – it should not be pink in the middle.
Serve with a cilantro and mint yogurt sauce or enjoy with a squeeze of lemon. Freeze the cooked kebabs for up to 3 months – just thaw and reheat on a grill pan before serving.

Welcome to the first week of our What’s Up World weekly summer series! For the next six weeks, we’re going to be taking an imaginary trip around the globe, reading one book from the Living in Around the World Collection and making a recipe that represents that country. (You can read more about the series by CLICKING HERE.)
Remember the international vacations you used to take with your spouse before you had children—the afternoons spent wandering down foreign cobblestone streets, sauntering through museums, and enjoying a leisurely glass of wine at at outdoor cafe? This is nothing like that. (What? You have kids now.) Instead, we’ll be exploring different cultures from the comfort of your own kitchen. There are no pricey plane tickets, no museum meltdowns, and no judgement if you choose to pour yourself a glass while you cook, because cooking with kids can have a common side effect of driving parents to drink. I kid, I kid.
We started our trip in Brazil, and I was surprised to see how interested my 3 and 6 year old boys were in learning about the country and locating it on our globe. This particular book about Brazil was narrated by a school aged boy that my kids could easily identify with. Like them, he lives in an apartment in the city and wears a uniform to school. I liked that the boys could see themselves in the narrator, and we talked about how his life would be similar and different to theirs. I personally have found that motherhood is a role that makes the world seem so much smaller since we all share many of the same struggles and joys, and I hope that on some level, this book helped my kids feel this way too.
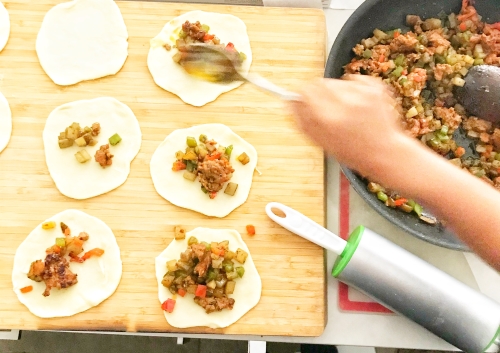
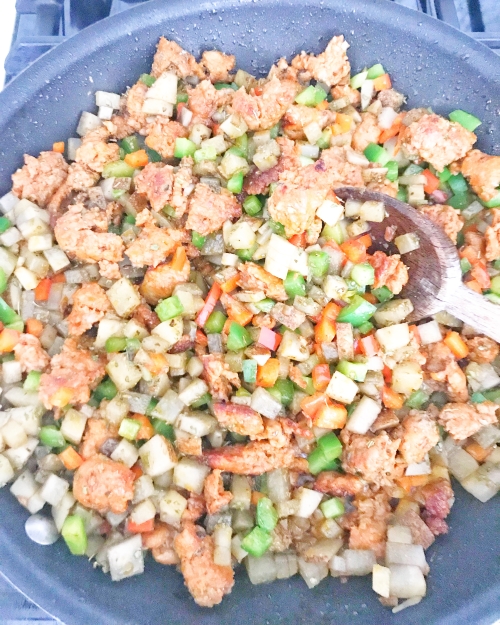
For the recipe, we went with a traditional Brazilian baked empanada that they refer to as Pastel al Forno made with chorizo, potato, and bell peppers. In Brazil, they typically bake their empanadas instead of frying them, which makes for a healthier recipe and a quicker clean-up. I did most of the chopping in advance, and the boys helped me (I use the term "help" very loosely--ha!) by taking turns sauteeing the filling, spooning the filling into the disks, wetting the edges of the disks, and poking holes in the top with a fork so that the steam could escape. These type of empanadas, I told them, were Brazil's version of fast food--something you could grab and go as an afternoon snack or quick meal--though they were disappointed that I didn't know if kids' meals in Brazil came with a toy.
It's been a while since I've cooked with my kids--evenings in the school year are just too chaotic--but I was pleasantly reminded how excited the kids were to have a hand in making the recipe and trying it. They couldn't wait to try the finished product and were so thrilled to shove food into their sister's mouth offer their sister bites of what they made. For us, this recipe was a huge success (my oldest ate 3!), and I believe it was partly because they helped out and also because the elements inside the filling were familiar enough--they're used to eating sausage, potatoes, and peppers. I'm planning on making this again and using it for lunchbox stuffers throughout the week.

You can also make extra filling by doubling the recipe below. Alone, it makes a delicious hash that you could top with a fried egg.
Here's hoping the next stop will be as successful. Join us next week as we head halfway around the world to India!
Chorizo, Potato, and Pepper Empanadas
makes 12 empandas
Ingredients:
1 package refrigerated pie crusts, cut into 12 1 1/2 in circles and then rolled out with a rolling pin until they are a 3 inch diameter*
2 tablespoons olive oil
1 small onion, diced
1 garlic clove, minced
3 chorizo links, diced
1/2 red bell pepper, diced
1/2 green pepper, diced
1 small russet potato, diced
1 teaspoon oregano
1/4 teaspoon each salt and pepper
Directions:
Make filling: Heat oil in a medium saucepan over medium heat. Add chorizo, onion, peppers and potato to the saucepan, and stir until vegetables and potato are fork tender, around 10-15 minutes. Add garlic and oregano, salt and pepper and cook for 2 minutes more. Cool filling to room temperature.
Form empanadas. Preheat oven to 400 degrees. Line a baking sheet with parchment paper. Place a small bowl of water next to the disks. Place 12 disks on a lightly floured surface, and spoon 2 tablespoons of filling into the center of the disk. Dip your fingers in the water, and run them around the outer edges of the disk. Fold dough in half and seal the edges with a fork. Flip the disk and use the fork to crimp the other side. Poke a hole in the top of the empanada, brush with olive oil, and place on the baking sheet. Repeat with the remaining 11 disks.
Bake for 15-20 minutes until empanadas are golden. Serve warm or at room temperature.
*You can also use empanada discos found in the freezer section of the grocery stores--just be sure to buy the variety that are meant for baking not frying.

Back in 2012 when I first started teaching baby food cooking classes, a client of mine mentioned that her husband had been making chocolate avocado pudding, and that her baby was gobbling it right up. I put the idea on my imaginary list of recipes that I wanted to recreate, and then—-like every other item on my to-do list that I write in my head but never on paper—I completely forgot about it. Fast forward five years when that baby of hers is ready to graduate kindergarten, and here I am in my kitchen finally checking off this recipe. Do I regret not trying this sooner? Yes, but mostly because recently when I pay for avocados at checkout, I have to do a doubletake (2 for $5--seriously?!) and then you get home, cut it open, and it's all pit. Five years ago, if I can remember correctly, the world was a cheaper place for avocados, and hashtags like #avocadoproblems and #avocadofail and #willworkforavocados (okay fine I made that last one up), were not yet a thing.
But I digress.
In truth, this recipe was a real win for the kids, and I already am thinking ahead to tweaking the recipe for avocado-chocolate fudgsicles this summer (stay tuned!). The avocado creates a perfectly creamy texture and a blank slate that lets the chocolate from cacao powder and semi-sweet chocolate chips really shine through. It comes together in minutes after a whirl in a food processor or blender, and since it's made without refined sugar, it's a treat that I'm happy to serve my kids regularly. Also, unlike every other avocado recipe in the world, this can be made up to 24 hours in advanced and stored in the refrigerator. Because of the chocolate, there's no telling if the avocado turns brown.
Finally, another perk to this recipe is that it's allergy friendly--perfect for friends who are allergic to milk or eggs. But everyone will love it!
CHOCOLATE AVOCADO PUDDING makes 4 servings Ingredients: 2 medium ripe avocados 1/2 cup semi sweet chocolate chips 1/4 cup cacao powder* 1 tsp pure vanilla extract 1/4 cup milk (cows, almond, coconut, or even water) pinch of salt 1/4 cup pure maple syrup Directions: In a microwave safe bowl, melt chocolate chips according to package directions. Cool for a few minutes, then add them to a food processor or blender with the remaining ingredients. Blend until no lumps remain, pausing to scrape down the sides of the bowl. Transfer mousse to a bowl, cover with plastic wrap, and chill for at least 20 minutes (or up to 24 hours before serving.
*I use cacao powder instead of cocoa powder because it is much less processed than cocoa powder and it contains a crazy high amount of fiber, nutrients, antioxidants and magnesium. You can find it in the same location in the grocery store as traditional cocoa powder. Yes, it's more expensive, but we use it sparingly enough that it's worth it for us.

I'm all about feeding my family the same foods (because: sanity), and guacamole is my go-to at least twice a week. The baby gets hers mashed and spoon fed, my 3 and 6 year olds like it with chips or spread on crackers, and I do the cliche avocado toast. I love using foods that they already like as a vehicle for getting them to taste new flavors, and this is an example of that. In place of lime juice and cilantro, this springy, refreshing version is made with fresh lemon juice, mint, and peas. The peas give the guac a serving of protein (yep, peas contain this filling, muscle-building nutrient!). You could add the peas whole, slightly mashed up, or use it for leftover baby food pea puree--because cooking one thing for everyone is always a win!
PEA AND MINT GUACAMOLE
Ingredients: 2 ripe avocados 1/2 cup peas OR 1/2 cup pea puree 1 tablespoon fresh mint leaves, chopped juice from half a lemon salt and pepper to taste
Directions: Combine all ingredients in a bowl. Mash with a back of a fork until you reach the desired chunkiness (I like mine a little chunky; the kids like theirs smoother). Add salt and pepper to taste.
Perfect for Valentine’s Day, these pretty pink pancakes get their rosy hue from dragonfruit!
Read More
It's so hard to believe that a full year has gone by since our baby Mae was born. She's brought pure joy into our lives because of her happy spirit and the way in which she turns her two older brothers into mushy love balls when they're around her. Baby love is the sweetest and most innocent love--that's for sure! Mae has been a great eater since I introduced her to real food at around 6 months old, and I'm cherishing this stage of feeding; she's too young to talk back or have an opinion, and she happily gobbles up everything I put in front of her. I know this stage is fleeting, so I'm enjoying every mealtime moment!
And when it came to making her first birthday smash cake, I wanted to give her something that was both delicious, but that didn't have any artificial yucky stuff like fake coloring or refined sugar. In fact, this cake is free of oils, butter, refined sugar, and food dyes. Instead, it's sweetened with lots of fresh fruit and a touch of pure maple syrup. The result is cake that has more of a muffin-like consistency--it's certainly not light and fluffy, but it IS sweet and delicious. I used cake flour for the batter, but you could easily substitute the same amount whole wheat, white whole wheat, or oat flour.

In lieu of a traditional buttercream icing that uses an entire box of confectioner's sugar, I went for a whipped cream topping made pink by adding in 1/8 cup of defrosted-from-frozen raspberries. The berries turned the batter a pretty pale pink. I later tested the recipe with an equal part of defrosted-from-frozen blackberries which turned the cream a beautiful purple hue. You can add in a tablespoon of confectioner's sugar to the cream topping for sweetness (I did), or omit it all together.
Lastly, I baked this in jumbo muffin tins (it made 6), but this amount of batter would fill 2 4 1/2 inch circular cake pans.
Mae loved her smash cake and dipping her chubby little fingers in the frosting. I felt great about giving her something GOOD. The boys loved the cake too and their only complaint was about who would be the one to blow out her candle--ha!

Healthier Smash Cake Ingredients: (for the cake) 1 cup cake flour 1/2 teaspoon aluminum free baking powde 1/2 teaspoon cinnamon 1/4 teaspoon salt 1 medium ripe banana 1/2 cup unsweetened applesauce 1/4 cup whole milk 2 tablespoons pure maple syrup 1 teaspoon pure vanilla extract 1 egg (for the icing) 1 cup heavy whipping cream 1 tablespoon confectioner's sugar (optional) 1/8 cup raspberries or blackberries, defrosted from frozen Directions: For the cake: Preheat oven to 350 degrees F. Spray muffin tins or cake pan with non-stick cooking spray. In a large bowl, whisk together the flour, baking powder, cinnamon, and salt. Set aside. In a blender, add banana, applesauce, milk, and maple syrup and vanilla. Blend until completely smooth. Whisk in the egg. Pour the wet ingredients into the bowl with the dry and stir until just combined; do not over mix. Divide batter evening among prepared pans. Bake for 14 minutes for standard cupcakes, 18 minutes for jumbo muffins, or 22 minutes for a 4 1/2 inch cake pan. Let cakes cool for 5 minute in the pan then transfer to wire racks. Cool completely before adding the icing. For the Frosting: Using an electric mixer, beat the heavy whipping cream and sugar, if using, until soft peaks form. Add in berries, if using, and beat until hard peaks form. Refrigerate until ready to use. Then use a rubber spatula to ice the cake. Store iced cake in the refrigerator to serve.

Is there any better excuse to force-feed your child get your child excited about green food than St. Patrick's day? I swear by baby spinach as my favorite healthy way to turn favorite foods green. It has a neutral flavor that blends seamlessly into whatever you're making: breads, muffins, smoothies, and pancakes! (Take a look at our yummy spinach muffins, here!) It gives these foods a vibrant green color--and not to mention a healthy dose of nutrients--without having to use food dyes. I've been known to blend it into pesto and even into my kids mac and cheese. Here, I added spinach to the blender with the wet ingredients of the pancakes so no evidence remains that there is spinach in these pancakes if you think your kids would be wary. But my kids are used to seeing the little green leaves go right into the blender, so they were happy to press the button and watch the milk turn green. I sweeten these naturally with banana, and you could easily replace that with 1/2 cup of unsweetened applesauce if you have that on hand. I also use white whole wheat flour so the color pops, but you could easily sub all-purpose flour or regular whole wheat flour, though the color might not be as vibrant with the latter.
Whatever you decide, this is the perfect HEALTHY green breakfast for St. Paddy's Day, don't you think?
GREEN PANCAKES makes 8 pancakes Ingredients:
1 1/2 cups packed fresh spinach
1 cup milk
1 large egg
1 medium banana
1 cup white whole wheat flour
1 teaspoon baking powder
1/2 teaspoon baking soda
1/2 teaspoon kosher salt
Directions: In a blender, combine the spinach, milk, banana, and egg and blend until smooth. In a medium bowl, whisk together the remaining ingredients. Pour the wet ingredients into the dry ingredients and whisk until just combined. Heat a large griddle over medium heat and grease with butter. Pour 2 tablespoons of the pancake mixture for each pancake and cook until the top begins to bubble, around 2 minutes. Flip the pancakes and cook for one minute longer and serve.

To this day, whenever I give my 5-year-old a muffin, he asks me "Is there Zucchini in it?" As a picky tot, muffins were one of my favorite ways to sneak in an extra veggie—until he learned my tricks. But if there's one thing he can't resist, it's chocolate, and these muffins offer up a double dose of that. They taste decadent and super chocolately, but they're also packed with not 1, not 2, but 3(!) types of fruits and veggies: a hefty dose of zucchini, banana, and applesauce. The end result is something so rich, that you would never guess they're good for you. Make a big batch, and stick them in the freezer so you can pop one out for lunch boxes or heck, even breakfast. They'll keep for up to three months in the freezer in an airtight container or for 2 days in the refrigerator.
HEALTHY DOUBLE CHOCOLATE ZUCCHINI MUFFINS makes 16 regular sized muffins
Ingredients: 1 1/4 cups whole wheat flour 1/4 cup unsweetened cocoa powder 1 teaspoon baking soda 1 teaspoon salt 2 ripe bananas 1/4 cup olive oil 2 eggs at room temperature 1/3 cup sugar 1/2 cup unsweetened applesauce 1/4 cup milk 1 teaspoon vanilla extract 2 cups shredded zucchini (about 2 small) 1/2 cup mini chocolate chips Directions: Preheat oven to 350 degrees. Spray two 12-cup muffins tin with cooking spray. In a medium bowl, whisk together flour, cocoa powder, baking soda, and salt. In a large bowl, mash bananas until no big lumps remain. Stir in oil, eggs, sugar, applesauce, milk, and vanilla until combined. Add zucchini and mix. Stir the flour mixture into the wet ingredients until just combined. Mix in chocolate chips. Using a 1/4 cup measuring scoop, divide batter evenly into prepared muffin tins, and bake for 20-22 minutes.

We're in a deep freeze of January when everyone seems to have the sniffles. I live firmly by the belief that one of the best ways to stay healthy (aside from hand washing!) is through food. Eating healthy foods truly can boost the immune system when you need it most--and perhaps there's no better food for health than kale. It contains cold-fighting vitamins A, C, K and zinc PLUS protein, calcium and omega 3s.
Before you roll your eyes when I tell you that we start most mornings with a green smoothie, I'll first make my case on how easy it is to do (seriously!). Baby kale and strawberries store right in the freezer, so there's no need to keep fresh produce around. Plus, I'll make a big blender full and use it for two days in a row (just give it a whirl, and you're good to go!).
One of my most successful strategies with my kids has been to start easy on the kale and work your way up. Since kale has a stronger flavor profile than spinach, go light on the kale on your first batch, and gradually increase it as your kids get used to the taste. I hope your kids like this version as much as mine do!
Kid-approved kale smoothie
(makes 2 8-ounce smoothies) Ingredients: a handful of kale leaves, stems removed or baby kale 3 frozen strawberries 1 banana 1 cup almond milk (sub regular milk) (optional) 1 teaspoon honey* Directions: Mix all ingredients in a blender until smooth, add some water if it is too thick. Store in the refrigerator for up to two days (reblend before serving since ingredients will separate).
*Do not use honey for babies under age 1
Peasful Kitchen was started as a social place for like minded parents to connect, learn, and enjoy making food for their families. We have since grown from a baby food company to a complete website that covers every stage of a families growth — from freezer meals for expectant moms, to baby and toddler food, to family dinners that bring smiles ( and sanity!) to your table.
Whether you’re a new mom who wants to serve your baby real food from the start, or you’re a veteran parent who wants to put more nutritious meals on the table, we can help you make dinnertime more do-able. Join us, and experience the confidence and pride that comes with taking the step to make your family healthier and happier.
CATEGORIES
We are constantly working to raise the bar on our services. If you have any questions or concerns about your experience, please let us know.
Nicole
nicole@peasfulkitchen.com